
OIDC
SSO configurations are only supported in on-prem Arthur installations
This page provides a walk-through for how to configure your Arthur installation to work with an OIDC compatible IdP.
In order to complete this guide, you need administrator access to your IdP and access to your Arthur installation's admin console configuration. Additionally, you will either need access to the Arthur superadmin user or be able to assume a role in your IdP to give yourself RBAC management permissions in Arthur.
This guide will walk through the following steps:
- Configure the IdP user groups and OIDC token claims
- Configure the IdP OIDC Settings
- Configure Arthur to work with your IdP
- Apply the Arthur IdP YAML configuration
- Create organization user roles to match the IdP user groups
- Test Access
- Cleaning Up
1. Configure the IdP user groups and OIDC token claims
In order to properly map users to permissions, Arthur requires a claim in your OIDC JSON Web Token (JWT) that contains information about the group memberships of the user. Each group in the IdP should correspond to a role in Arthur's {doc}custom_rbac permission system.
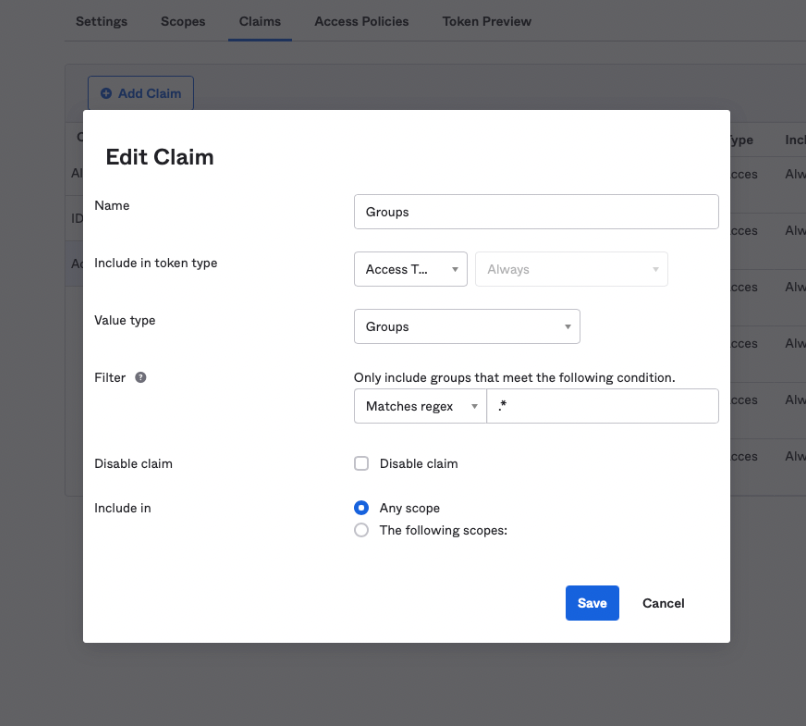
This process can vary depending on your IdP, but most IdP's should have a user grouping mechanism, and a mechanism to configure attributes in the JWT claims. For example using Okta, admins can configure the JWT claims to include group information under their account's Security -> API -> default -> Claims then the "Add Claim" button. From the popup, give the claim a name, "Groups" in this example, set the "Include in token type" to "Access Token", select "Value type" as "Groups", and include a "Matches regex" filter to select the groups to include:
Retrieving an example OIDC token is IdP-specific and may involve completing the sign-in flow via a script or API client. An alternative can be to use a 3rd party like https://oidcdebugger.com, but that will require whitelisting https://oidcdebugger.com/debug as a valid redirect URL for your Arthur SSO app (this could be enabled temporarily for debugging, then removed). Here is an example JWT after setting the group claims field:
{
  "iss": "https://dev.okta.com/oauth2/default",
  "aud": "api://default",
  "scp": [
    "openid"
  ],
  "Groups": [
    "idp-admin",
    "org-1-model-owner",
    "org-2-model-owner"
  ],
  "FirstName": "John",
  "LastName": "Doe",
  "Login": "[email protected]"
}
As the example token shows, the user's groups in the IdP are populated as a string list in the "Groups" field in the token. Arthur will use this list of groups to match the user to the corresponding roles in Arthur by name.
2. Configure the IdP OIDC Settings
In order for your IdP to speak to Arthur, it needs to know where to find it. Enter the following URL in your IdP's configuration to whitelist Arthur's callback endpoint (sign-in redirect
URL): https://<YOUR ARTHUR HOST>/login/callback.
Additionally, the IdP will need to know what OIDC protocol to speak with Arthur. Today, Arthur supports two protocol flows:
implicitPKCE
Both flows are intended to be used with "Single Page Applications" or SPAs. Follow the configuration for your IdP that matches one of those two flows with SPAs. Additionally, note the following settings from your IdP in order to use in the Arthur configuration below:
- Client ID
- Resource ID (if available)
- OIDC flow (PKCE or implicit)
- Audience (value that is set in the token by the IdP)
3. Configure Arthur to work with your IdP
Next, Arthur needs to know how to handshake with your IdP. To do that, Arthur requires the following
information:
- Your IdP's discovery URL, typically in the format
<IdP path>/.well-known/openid-configurationURL that contains the relevant endpoints for your IdP.If this page isn't accessible to Arthur due to CORS or other restrictions, the values can be provided manually. - One or more IdP administrator user groups that will be paired to global custom roles in Arthur
(see here for a description of what these are for) - An understanding of your OIDC token claims (values) and how to parse user information out of it
- The four configuration values captured above from your IdP
With that information available, it is possible to fill out Arthur's IdP configuration YAML. The next subsections explain each subsection of the Arthur YAML configuration, and is followed by some complete examples further down.
Configuring the IdPs discovery URL
Almost all OIDC IdP's have accessible discovery URLs, but some do not provide CORS support for them, so their contents need to be filled out manually. To support either option, Arthur has two configurations that can be used, discoveryBaseURL or endpointOverrides. If your IdP has CORS restrictions, see Appendix B for additional setup that is required.
# use this option if your IdP has an accessible discovery URL
# IMPORTANT: don't include the /.well-known/openid-configuration suffix!!
# for example, if the full URL is https://<HOST>/oauth2/default/.well-known/openid-configuration
# only specify: https://<HOST>/oauth2/default
discoveryBaseURL: "https://<HOST>/oauth2/default"
# use this option if your IdP has CORS restrictions on the discovery URL, otherwise comment this out.
# fill in the values manually from the discovery endpoint's contents
endpointOverrides:
  issuer: "issuer string for the IDP"
  authorization_endpoint: "URL ending in /authorize"
  token_endpoint: "URL ending in /token"
  jwks_uri: "URL ending in /keys"
  userinfo_endpoint: "URL ending in /userinfo"
  # note not all IdPs will have the following endpoints, fill in as many as you can
  end_session_endpoint: "URL ending in /logout"
  device_authorization_endpoint: "URL ending in /devicecode"
  revocation_endpoint: "URL ending in /revoke"
  introspection_endpoint: "URL ending in /introspect"
  registration_endpoint: "URL ending in /clients"
Configure the Arthur Global Roles
Arthur has the ability to create roles for the cluster administrators during the configuration of the IdP. These roles are often needed by admins to configure RBAC and create organizations for other users in the system. See {ref}creating_global_roles_in_arthur_config for a deep dive on how to use global roles.
Global Roles in the UI
Global Roles only provide access for the Arthur API, and therefore, cannot be used to grant universal access to workflows in the Arthur UI. A user that belongs to a group that maps to a Global Role will not be able to see all organizations in the UI, nor enter and read/write data in a specific organization unless they are bound to a role within that organization through an Organization-Scoped Role.
This section of the YAML config is under the globalRoleDefs field. It accepts a list of role definitions that will be created when the configuration is applied. The names of the roles in this section must match the user groups in your IdP in order to be able to assume them in Arthur.
  globalRoleDefs:
    # Here we can specify a list to define multiple global roles
    - name: "idp-admin" # change this name to match the cluster administrator group name in your IdP
      permissions:
        custom_roles:
          - read
          - write
          - delete
        organization_global:
          - read
          - write
        organization:
          - read
          - delete
        model:
          - read
          - write
          - delete
Parsing the IdP JWT claims
In order for Arthur to communicate with your IdP, it needs to understand the format of the JWT claims your IdP uses. This section of the config falls under the accessTokenValidation YAML field. This section is designed to be flexible to support a variety of claim formats, so it has a lot of options. At its core, the goal is to tell Arthur how to be able to extract the following information from the claims:
- user roles/groups
- first name
- last name
- user ID
Each field has a corresponding YAML configuration that defines where to find the information in the JWT claims. For example:
claimMapping:
  firstName: FirstName
This configuration tells Arthur that it can find the user's first name under the "FirstName" claim in the JWT. Such a token might look like this:
{
  "iss": "https://dev.okta.com/oauth2/default",
  "aud": "api://default",
  "scp": [
    "openid"
  ],
  "Groups": [
    "idp-admin",
    "org-1-model-owner",
    "org-2-model-owner"
  ],
  "FirstName": "John",
  "LastName": "Doe",
  "Login": "[email protected]"
}
More examples of how to parse user information out of the JWT claims can be
found below.
Full Configuration Examples
Here is an example of a full configuration, combining each section described above.
version: v2
kind: OIDC
config:
  # discovery URL without the /.well-known/openid-configuration suffix
  discoveryBaseURL: https://example.com/oauth2/default
  # Either "implicit" or "PKCE"
  flowType: PKCE
  # client ID from your IdP for the Arthur SSO application
  clientID: "client id string"
  # optional: resource ID from your IdP for the Arthur SSO application if required by the IdP
  resourceID: ""
  authorizeScopes:
    - openid  # required for OIDC
  # use this section to define global roles
  # one example role would be to give the cluster admin permissions to create organizations and manage custom roles
  globalRoleDefs:
    - name: "iam-admin"  # change this to match the user group name in your IdP for administrators
      permissions:
        custom_roles:
          - read
          - write
          - delete
        organization_global:
          - read
          - write
        organization:
          - read
          - delete
  # this section describes how to parse the user information out of the JWT returned from the IdP
  # this is used by Arthur to understand who the user is and what their roles are
  accessTokenValidation:
    type: JWT  # only JWT is supported today
    # fields in the token Arthur will use to extract the authentication information
    claimMapping:
      roles: Groups  # this is telling Arthur to look in the "Groups" claim to find the list of user's roles
      userID: EmployeeID
      username: Login
      firstName: FirstName
      lastName: LastName
      email: Login

    # one or more audiences to validate, this should match your IdP's configuration
    audience:
      - api://default

    # optional override signature algo
    # signatureAlgo: RS256
Here is an additional descriptions of the fields that need to be set in the config YAML above:
discoveryBaseURL: This is the base URL for your Identity Provider. Your IdP should have
a/.well-known/openid-configurationendpoint and the
discoveryBaseURL is simply that url minus the/.well-known/openid-configurationpart.flowType: We support both implicit and PKCE flows. Consult with your team to decide which OIDC flow type is right
for your organization.clientID: When you create the application integration in your IdP, a Client ID will be provided to you. Paste that
value into this field.resourceID: This is optional. If your IdP gives you a Resource ID when creating your application integration, paste
the value here.claimMapping: We extract various pieces of authentication information from the provided JWT access token. However,
there is no common standard for
how these pieces of information should be formatted in the token. For us to extract this information from the token,
we need you to explicitly tell Arthur
where this information is stored in the token. For example, a username could be stored in a field calledusername
orloginoremailoruserID.
In order to get this user information, a mapping needs to be provided for the following itemsroles: This is the field for where either a single authorization role or a list of authorization roles will be
specified.
Note that this is not where you paste a list of roles, this is the name of a field in the JWT where the
user's roles are specified.
For help with role definitions, see {doc}custom_rbac.(Required)userID: This is the field for a unique identifier for the user; this is frequently the same asusername
and/oremail. (Optional, omit if empty)username: This is the field for the user's unique username; this is frequently the same asusername
and/oremail. (Optional, omit if empty)firstName: This is the field for the user's first name. (Optional, omit if empty)lastName: This is the field for the user's last name. (Optional, omit if empty)email: This is the field for the user's email. (Optional, omit if empty)
audience: This is part of the JWT standard. Theaudfield for any JWT you create must be a value in this list. For
example in the above configuration, any token that has anaudfield that is not set toapi://defaults, the token
will be automatically rejected by Arthur. If you are having trouble finding this value, it is frequently the same as
yourresourceID. Remember to format this as a list, not a single value.
If your IdP has CORS restrictions see
[Appendix B](#appendix-b-setup-for-idps-with-cors-restrictions) below for a workaround.
4. Apply the Arthur IdP YAML configuration
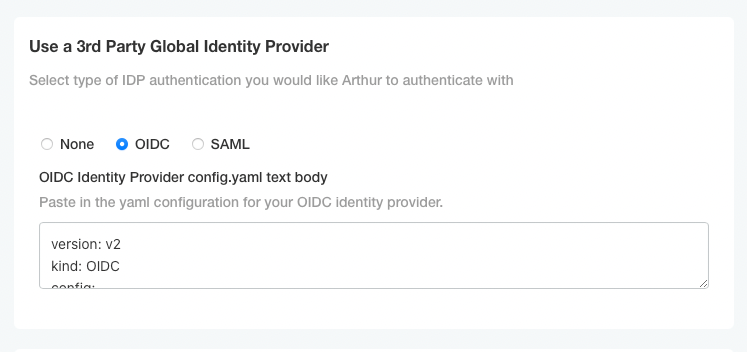
Once you have your YAML configuration file ready, you need to add it to your Arthur installation. With the Arthur admin console open, navigate to the "Use a 3rd Party Global Identity Provider" section and select "OIDC". This will expose a text box for you to paste the YAML config file assembled above. When pasting, make sure whitespace is preserved and the YAML document has consistent spacing (do not mix tabs and spaces). Here is a screenshot of the config section:
Once you have added your config files, scroll to the bottom and click "Save" to save the config. Then go to the latest
version and click "Deploy" to roll out the change to the cluster.
5. Create organization user roles to match the IdP user groups
In order to complete this section, you will need access to the Arthur superadmin user credentials set during your install, or you will need to be able to assume the role defined in the Arthur IdP config YAML created above in the globalRoleDefs section.
In order to use the API example linked below, you will need a Bearer token (authentication token) to include with your API request. There are a few options available to retrieve a token:
- Retrieve a global role token directly from your IdP - Most IdPs will have a method to retrieve tokens for users. Some companies make scripts or APIs that allow retrieving a token. If your IdP does not have an automated method to retrieve a token, you can try setting up a tool like https://oidcdebugger.com (this may involve adding
https://oidcdebugger.comas an allowed URL in your IdP settings). - Retrieve a global role token from your browser cookies - If you sign in to Arthur as a user with a global role, the UI will not be fully functional, but it will have a valid access token in the cookies. If you navigate to your browser's developer console and then go to the Application Storage/Cookies section, you should see a cookie like
ArthurAuth0, which is your authentication token. Note: if your user has a large number of groups, there may be multiple cookies of the formArthurAuthN. In this case your token was too large to fit in the browser cookie, so it had to be split. You can assemble the full token by concatenating the values of theArthurAuthNcookies in order. - Use the /login API endpoint with the superadmin user's credentials set during the Arthur install (only available on-prem).
Using either of those credentials, we can use the Arthur API to define roles in Arthur that match the user group names in your IdP. See the {ref}creating_organization_roles section for an example API request to create custom roles in Arthur. Importantly, the role names must uniquely match to a user group in your IdP in order for your users to be able to assume those permissions in Arthur. Therefore, the roles in Arthur must be globally unique in the entire Arthur installation.
6. Test Access
At this point everything should be configured correctly to sign in to Arthur via SSO. Either navigate to your IdP or the Arthur homepage to test logging in.
7. Cleaning Up
Once users are successfully able to log in to Arthur via the IdP, you should do the following to ensure proper security best-practices remain enforced:
- Restrict any Arthur global roles to only allow access to essential admin functions
- Set the Arthur superadmin user password securely, and either store the password in a vault, or discard the password entirely. superadmin shouldn't be used going forward.
- Set up a policy to routinely rotate the superadmin password to keep it secure
Together, these practices will help ensure the security of your Arthur installation, and will give your IdP sole control over the platform and who is able to access it.
Common Troubleshooting
If after following the steps above, users are not able to log in via the IdP try some of these common troubleshooting tips:
Does the user properly redirected to the IdP's log in screen?
If not, there is likely a configuration error in the Arthur YAML config with the IdP discovery URL. Double check that the url entered resolved correctly when you append /.well-known/openid-configuration to the end of it. The full URL should be viewable in your browser or via a REST client.
Once the user authenticates with the IdP, are they redirected to the Arthur homepage?
If not, there is likely a configuration error with the IdP and the URLs that it uses to communicate with Arthur. Double-check the redirect (whitelisted) URL is configured correctly for the Arthur installation at https://<HOSTNAME>/login/callback.
A user can see the Arthur home page, but can't see any of the model in their organization
If a user cannot see any of the models in their organization, it means they either don't have the necessary permissions to access models (see {doc}../../reference/permissions_by_endpoint) or they were not able to correctly assume the role in Arthur. Double-check the groups in their JWT claims match the role names that have been configured in Arthur. A superadmin or global role user with permissions to manage RBAC can see a list of roles in the installation by using the following API call. Be sure to replace the HOST and AUTH TOKEN for your installation and user:
curl --location 'https://<HOST>/api/v3/authorization/custom_roles' \
--header 'Authorization: Bearer <INSERT AUTH TOKEN HERE>'
Appendix A: More examples of JWT claims and how to parse them
This section outlines some additional ways to use the accessTokenValidation section of the Arthur IdP config YAML format. The below examples include sample JWTs, then corresponding YAML for how to parse them.
Basic Full Example
This example shows how to parse a user's information from JWT claims in a typical format.
Example parsed JWT claims JSON:
{
  "iss": "https://dev.okta.com/oauth2/default",
  "aud": "api://default",
  "scp": [
    "openid"
  ],
  "Groups": [
    "idp-admin",
    "org-1-model-owner",
    "org-2-model-owner"
  ],
  "FirstName": "John",
  "LastName": "Doe",
  "Login": "[email protected]",
  "EmployeeID": "1234567890"
}
Corresponding settings for the Arthur IdP config YAML accessTokenValidation for the user information field:
accessTokenValidation:
  type: JWT
  claimMapping:
    roles: Groups
    userID: EmployeeID
    username: Login
    firstName: FirstName
    lastName: LastName
    email: Login
Minimal Example
This example shows how to parse a user's information from JWT claims when many fields are missing.
Example parsed JWT claims JSON:
{
  "iss": "https://dev.okta.com/oauth2/default",
  "aud": "api://default",
  "scp": [
    "openid"
  ],
  "Groups": [
    "idp-admin",
    "org-1-model-owner",
    "org-2-model-owner"
  ],
  "user": "[email protected]"
}
Corresponding settings for the Arthur IdP config YAML accessTokenValidation for the user information field:
accessTokenValidation:
  type: JWT
  claimMapping:
    roles: Groups
    userID: user
    username: user
    firstName: ""
    lastName: ""
    email: user
Appendix B: Setup for IdPs with CORS Restrictions
Completing this will require access to the Kubernetes cluster Arthur is running in, and the ability to create ingress resources in that cluster.
If your OIDC Identity Provider does not support CORS (common with Microsoft Azure AD), you will need to proxy requests via the Arthur backend. The following examples show how this can be done with a cluster using the NGINX ingress controller.
This first example YAML configures a route on NGINX that will proxy OIDC connections to your IdP. You'll need to replace the <IDP HOST> and <ARTHUR HOST> placeholders, then apply it to your cluster with kubectl apply -n <NAMESPACE> -f file.yaml. There should be two places to fill in each variable below.
apiVersion: v1
kind: Service
metadata:
  name: external-idp
spec:
  type: ExternalName
  externalName: "<IDP HOST>"
---
apiVersion: networking.k8s.io/v1
kind: Ingress
metadata:
  name: external-idp
  annotations:
    kubernetes.io/ingress.class: nginx
    nginx.ingress.kubernetes.io/rewrite-target: /$2
    nginx.ingress.kubernetes.io/backend-protocol: "HTTPS" #important
    nginx.ingress.kubernetes.io/upstream-vhost: "<IDP HOST>"
spec:
  rules:
    - host: "<ARTHUR HOST>"
      http:
        paths:
          - backend:
              service:
                name: external-idp
                port:
                  number: 443
            path: /oidc(/|$)(.*)
            pathType: Prefix
  tls:
    - hosts:
        - "<ARTHUR HOST>"
      secretName: kotsadm-tls
After you've applied the above configuration to your cluster, you should be able to visit your IdP's /.well-known/openid-configuration endpoint at the following URL: https://<ARTHUR HOST>/oidc/<your IdP's .well-known endpoint path>. Once that is accessible, we need to modify the OIDC YAML configuration file. Fill in the following example with the correct values in the endpointOverrides section. Note, the issuer and authorization_endpoint fields should match what is in your IdP's /.well-known spec. The rest of the values should use the same path as shown in the IdP's /.well-known spec, but with the value of <ARTHUR HOST>/oidc/ substituted for the host of the IdP. The following example shows a proper CORS config for an IdP at the https://XXXX.okta.com address.
version: v2
kind: OIDC
config:
  discoveryBaseURL: https://XXXX.okta.com/oauth2/default
  # if your IdP has CORS restrictions with the metadata URL,
  # specify this block to prevent using the metadata endpoint to look them up
  endpointOverrides:
    # these first two match the IdP's .well-known spec
    issuer: "https://XXXX.okta.com/oauth2/default"
    authorization_endpoint: "https://XXXX.okta.com/oauth2/default/authorize"
    # notice the following are all modified to add the <ARTHUR HOST>/oidc prefix in the URL
    token_endpoint: "https://<ARTHUR HOST/oidc/oauth2/default/tokens"
    jwks_uri: "https://<ARTHUR HOST/oidc/oauth2/default/keys"
    userinfo_endpoint: "https://<ARTHUR HOST/oidc/oauth2/default/user_info"
    end_session_endpoint: "https://<ARTHUR HOST/oidc/oauth2/default/logout"

  # the rest of this file is unchanged from the examples above...
Once you have modified this YAML file accordingly, follow the steps
above to save it to your installation.
Updated over 1 year ago