
Registering A Model with the API
This page describes the process of registering models through standard REST API calls.
Introduction
As an API-first solution, Arthur Scope allows the entire model onboarding process to be fully automated, either through our SDK, or through standard REST API calls. This allows Arthur to be integrated with basically any ML platform, workflow management or automation software. This is possible because every step of the onboarding process can be achieved through API calls.
In this page, we will describe the process of onboarding a model using standard API calls. We will also be providing hints about how the SDK can be leveraged to help with some of these steps, for python-based automation environments.
The main steps required to onboard a model are:
- Create the model schema definition and set basic metadata
- Save the model
- Upload reference dataset for model
- Manage model Enrichments (Bias monitoring, Explainability, Hotspots, etc)
- Create model Alert Rules (optional)
Create the model schema definition and basic metadata
To onboard a model, Arthur Scope needs information about the attributes (input, non-input, prediction and ground truth), as well as some basic metadata about the model.
When onboarding a model through the API, this information is sent in JSON format, as in the example below:
{
    "display_name": "Credit Risk",
    "partner_model_id": "CreditRiskModel_FG_20230523115857",
    "description": "Credit Risk Model Created Through REST API",
    "input_type": "TABULAR",
    "output_type": "MULTICLASS",
    "attributes": [
      {
          "name": "LIMIT_BAL",
          "value_type": "INTEGER",
          "stage": "PIPELINE_INPUT",
          "position": 0,
          "categorical": false,
          "min_range": 10000,
          "max_range": 1000000,
          "monitor_for_bias": false,
          "is_unique": true,
          "is_positive_predicted_attribute": false
      },
      ...
    ],
    "tags": ["Tabular", "Classification", "Credit"],
    "is_batch": true,
    "version_label": "Credit Risk v1"
}
PS: most of the attributes were removed from this code block, for readability.
Please refer to the documentation for more details on which metadata parameters are required. Do keep in mind that the partner_model_id attribute must be absolutely unique, even across different versions of the model, or for models that were deleted and re-created. The recommendation is to add a timestamp to the ID, in order to avoid potential duplication.
When preparing the model schema, the bulk of the work will go to the task of preparing the list of attributes. As we can see from the example above, the model attributes are sent as a list inside the JSON payload. This list must include all input, non-input (optionally), prediction, and ground truth attributes. Attributes cannot be added once the model is saved, so this list must be complete at model saving time.
Every attribute has several parameters that can be set. This is a more complete list of parameters from the API documentation:
{
"name": "string",
"label": "string",
"value_type": "BOOLEAN",
"stage": "GROUND_TRUTH",
"position": 0,
"categorical": false,
"categories": [],
"min_range": 0,
"max_range": 0,
"monitor_for_bias": false,
"bins": [],
"is_unique": false,
"is_positive_predicted_attribute": false,
"attribute_link": "string",
"gt_class_link": "string",
"implicit": false
}
Do note that some of these parameters only apply to certain types of attributes. A brief description of each attribute can be found in the table below:
| Attribute | Description |
|---|---|
| name | Name of the attribute. Must be unique within the model. |
| label | A friendly label that can be set for attribute names that are encoded. |
| value_type | Type of data managed by the attribute (integer, float, etc). A list of supported value types can be found here. |
| stage | Determines whether this attribute is input, non-input, prediction or ground truth. |
| position | This is an incremental counter that should start with 0 and increase by 1 for each attribute (with the exception of prediction and ground truth attributes, that must start at zero). |
| categorical | Set it to true if the attribute has a limited number of potential values. |
| categories | List all the categories (potential values) for the attribute. Only relevant if categorical is set to true. |
| min_range | For non-categorical, numerical attributes. Lowest numerical value this attribute should receive (PS: this will not be enforced as a threshold limit). |
| max_range | For non-categorical, numerical attributes. Highest numerical value this attribute should receive (PS: this will not be enforced as a threshold limit). |
| monitor_for_bias | True or False. Determines whether or not this attribute should be monitored for bias. |
| bins | For non-categorical, numerical attributes that are being monitored for bias. Describes the bins (or buckets) that Arthur should use to group inferences as it checks for bias. |
| is_unique | Used to determined if the values of the attribute are unique (PS: this will not be enforced through unique constraint validation). |
| is_positive_predicted_attribute | Only used for the predicted attribute of a binary classification model (where there's a 'positive' and 'negative' prediction. |
| attribute_link | Used to associate prediction attributes to their corresponding ground truth attributes. |
| gt_class_link | Used for single ground truth class models, where the prediction attribute is associated with the corresponding string value of the ground truth class. |
Next, let's examine some attributes to see how they can be configured.
{
  "name": "LIMIT_BAL",
  "value_type": "INTEGER",
  "stage": "PIPELINE_INPUT",
  "position": 0,
  "categorical": false,
  "min_range": 10000,
  "max_range": 1000000,
  "monitor_for_bias": false,
  "is_unique": false,
  "is_positive_predicted_attribute": false
},
This is an integer input attribute, non-categorical, that can range between 10,000 and 1,000,000. It will not be monitored for bias.
{
  "name": "AGE",
  "value_type": "INTEGER",
  "stage": "PIPELINE_INPUT",
  "position": 1,
  "monitor_for_bias": true,
  "bins" : [
    {
      "continuous_start" : 0,
      "continuous_end" : 35
    },
    {
      "continuous_start" : 35,
      "continuous_end" : 55
    },
    {
      "continuous_start" : 55,
      "continuous_end" : 100
    }
  ],
  "categorical": false,
  "min_range": 21,
  "max_range": 79,
  "is_unique": false,
  "is_positive_predicted_attribute": false
},
This is an integer input attribute, non-categorical, being monitored for bias. Because this attribute is non-categorical, we need to specify the bins for bias monitoring, so that Arthur knows how to group the inferences.
{
  "name": "SEX",
  "value_type": "INTEGER",
  "stage": "PIPELINE_INPUT",
  "position": 2,
  "monitor_for_bias": true,
  "categorical": true,
  "categories": [
    {
      "value": "1",
      "label": "Male"
    },
    {
      "value": "2",
      "label": "Female"
    }
  ],
  "is_unique": false,
  "is_positive_predicted_attribute": false
},
This is an integer input, categorical attribute. It will be monitored for bias; in this case, Arthur will used the defined categories to group inferences for bias monitoring.
{
  "name": "UNIT_CODE",
  "value_type": "STRING",
  "stage": "PIPELINE_INPUT",
  "position": 3,
  "categorical": true,
  "monitor_for_bias": false,
  "categories": [
    { "value": "DW00" }, { "value": "A800" }, { "value": "YZ00" }, { "value": "M 00" }, { "value": "H 00"},
    { "value": "H100" }, { "value": "N 00" }, { "value": "T800" }, { "value": "A 00" }, { "value": "GX00"},
    { "value": "RG00" }, { "value": "JL00" }, { "value": "TC00" }, { "value": "R 00" }, { "value": "LV00"},
    { "value": "E 00" }, { "value": "T 00" }
  ],
  "is_unique": false,
  "is_positive_predicted_attribute": false
},
This is a string input. All string input attributes should be categorical.
{
  "name": "RISK_AMT",
  "value_type": "FLOAT",
  "stage": "NON_INPUT_DATA",
  "position": 4,
  "categorical": false,
  "min_range": 10152.23,
  "max_range": 999990.0,
  "monitor_for_bias": false,
  "is_unique": false,
  "is_positive_predicted_attribute": false
},
This is a float, non-input attribute. It is non-categorical and it will not be monitored for bias.
{
  "name": "prediction_1",
  "value_type": "FLOAT",
  "stage": "PREDICTED_VALUE",
  "position": 1,
  "categorical": false,
  "min_range": 0,
  "max_range": 1,
  "monitor_for_bias": false,
  "is_unique": false,
  "is_positive_predicted_attribute": true,
  "attribute_link": "ground_truth_1"
},
{
  "name": "ground_truth_1",
  "value_type": "INTEGER",
  "stage": "GROUND_TRUTH",
  "position": 1,
  "categorical": true,
  "categories": [
    { "value": "0" },
    { "value": "1" }
  ],
  "is_unique": false,
  "monitor_for_bias": false,
  "is_positive_predicted_attribute": false,
  "attribute_link": "prediction_1"
}
This is a pair of matching prediction and ground truth attributes. They must be explicitly correlated for Arthur to be able to calculate performance metrics. Regression models will have one prediction and one ground truth attributes, while multiclass models will have many. For every prediction attribute declared, a corresponding ground truth attribute must also be provided, even if this model is not expected to receive ground truth data at all.
The position of these elements should match as well. In this case, the prediction_1 is the 'positive' prediction made by the model, so we will mark it as such.
Arthur expects the prediction attribute to always be a float (the probability of this class), while the ground truth should be either an integer (0 or 1) or a String.
The Arthur SDK can be used to help with the process of mapping model attributes, especially for models with dozens or hundreds of attributes. The SDK provides a build() function that will create a dataframe with the model attributes, based on the reference data provided. This dataframe can then be converted to JSON and used on a direct REST API call. Consider leveraging the Arthur SDK to do the basic mapping of attributes, and then apply your specific logic to ensure the proper value types, ranges, categories, etc.
Save the Model
With the model schema and metadata in place, saving the model is a simple call to:
POST {{hostname}}/api/v3/models
Documentation: https://docs.arthur.ai/api-documentation/v3-api-docs.html#tag/models/paths/~1models/post
PS: this will require credentials with the Model Owner role, or a custom role allowed to create models.
If the call is successful, the return message will include the model ID. This model ID will be required for all subsequent calls, so make sure to save it to an environment variable.
A number of backend operations are executed at model saving time, including creating the database tables for the model, along with Kafka topics and other components. This process should only take a few seconds.
At this time, the model is saved and it has the necessary infrastructure to receive data. However, since no reference dataset is available, Drift and Anomaly Scores will not be calculated. Also, none of the other enrichments will have been enabled.
Upload Reference Dataset for Model
The reference dataset is required to calculate Drift metrics, as well as to train the Anomaly Score model that Arthur will create for each model being monitored.
When models are saved through the Arthur SDK, several tasks happen automatically behind the scenes: the SDK will save the reference data to a parquet or json file, and will upload it to Arthur once the model is done saving. Those steps must be executed explicitly when saving the model through direct API calls.
The reference data must contain all input, non-input, prediction, and ground truth attributes. It must also include the column headers:
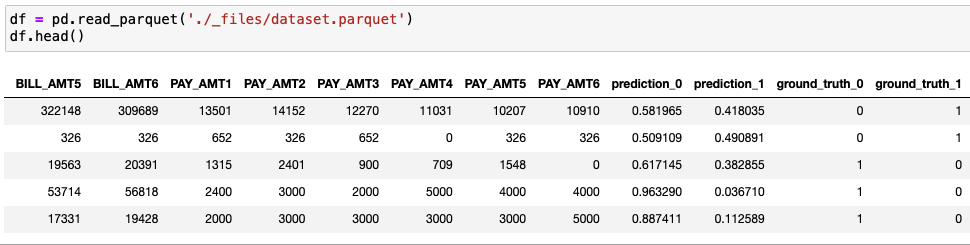
It should also be representative of all expected values for the inferences; otherwise, the Drift scores might be misleading. For instance, if the reference dataset is only comprised of records for customers between 20 and 50 years old, any inference data about 80-year-old customers will receive a high drift score.
Setting the reference data is done in 2 steps:
- Upload the reference data
- Close the reference data
Upload the Reference Data
The parquet or json file can be uploaded to the following API endpoint:
POST {{hostname}}/api/v3/models/{{model_id}}/reference_data
The file should be attached as reference_data. This is a python example for that call:
payload = {}
files=[
  ('reference_data',('dataset.parquet',open('/Users/.../dataset.parquet','rb'),'application/octet-stream'))
]
headers = {
  'Arthur-Organization-ID': '{{organization_id}}',
  'Authorization': '{{access_token}}'
}

response = requests.request("POST", url, headers=headers, data=payload, files=files)
PS: The Arthur-Organization-ID header is required for environments with multiple organizations.
The return message will include the number of records that were successfully uploaded. Note this number, as you will need it for the next call.
Close the Reference Data
Arthur will wait until the reference data is closed before doing the backend processing (which includes training the anomaly score model and other tasks). The reference data can not be modified once it's closed, so ensure the proper data is in place before executing the next call.
Reference data can be closed through a PATCH call to the same endpoint as before:
PATCH {{hostname}}/api/v3/models/{{model_id}}/reference_data
The body must include the number of records uploaded, which must match the number of successful records uploaded in the previous step:
{
"status": "uploaded",
"total_record_count": 30000
}
In this case, the reference data uploaded had 30,000 records.
Manage Model Enrichments
Arthur provides a set of standard Enrichments that are available for all model types. Other Enrichments will be specific to certain model types. In this section, we will review the available API endpoints for the different Enrichment capabilities.
Main Documentation page: https://docs.arthur.ai/api-documentation/v3-api-docs.html#tag/enrichments
Keep in mind that most Enrichments will only be applied to new inferences. Make sure to have all Enrichments enabled before the model gets populated with data.
Retrieving a list of current Enrichments
The following API endpoint can be used to fetch a list of Enrichments configured for a model:
GET {{hostname}}/api/v3/models/{{model_id}}/enrichments
The return message (for a fully configured model) will look like this:
{
    "anomaly_detection": {
        "enabled": true,
        "config": {}
    },
    "bias_mitigation": {
        "enabled": false
    },
    "explainability": {
        "enabled": true,
        "config": {
            "sdk_version": "3.25.0",
            "python_version": "3.8",
            "explanation_algo": "shap",
            "model_server_cpu": "1000m",
            "model_server_memory": "1Gi",
            "explanation_nsamples": 2000,
            "shap_expected_values": [
                0.8227832963996526,
                0.17721670360034752
            ],
            "inference_consumer_cpu": "100m",
            "inference_consumer_memory": "256Mi",
            "model_server_max_replicas": 2,
            "inference_consumer_score_percent": 1,
            "streaming_explainability_enabled": true,
            "user_predict_function_import_path": "entrypoint",
            "inference_consumer_thread_pool_size": 2
        }
    },
    "hotspots": {
        "enabled": true,
        "config": {}
    }
}
In this example, we can see that this model has Anomaly Detection, Explainability and Hotspots enabled, while Bias Mitigation is currently disabled.
It is possible to update the configuration for all Enrichments with a single call. The URL would be the same as described above, only using the PATCH method instead of GET. The JSON block above would be sent as part of the form-multipart request. Do keep in mind that Explainability requires additional assets to be attached (this will be covered further down in this page).
Anomaly Detection
Anomaly Detection is automatically enabled for every model other than Time Series input models, once the Reference Data is uploaded (and closed). Because of this, it does not need to be explicitly enabled after the model is saved. It can be disabled and re-enabled at any time (at which point, the anomaly score model will be re-trained from the reference data).
This is the API endpoint to check the status of the Anomaly Detection Enrichment:
GET {{hostname}}/api/v3/models/{{model_id}}/enrichments/anomaly_detection
The return payload will look like this:
{
    "enabled": true,
    "config": {}
}
To modify the status (enable/disable), the same endpoint can be used, with the PATCH method:
PATCH {{hostname}}/api/v3/models/{{model_id}}/enrichments/anomaly_detection
The request body will contain the desired status for the Enrichment:
{
  "enabled": false
}
In this case, Anomaly Detection is being disabled for this model.
Bias Mitigation
To check the status of Bias Mitigation, use this API endpoint:
GET {{hostname}}/api/v3/models/{{model_id}}/enrichments/bias_mitigation
The return payload will be similar to this:
{
    "enabled": false
}
To update the status, use the same endpoint, with the PATCH method:
PATCH {{hostname}}/api/v3/models/{{model_id}}/enrichments/bias_mitigation
The request body will contain the desired status for this Enrichment:
{
  "enabled": false
}
Hotspots
Hotspots is a capability that aims to identify and surface regions of underperformance in the model. It is currently only available for Tabular - Classification models. Hotspots will not be automatically enabled once the model is saved. It can, however, be enabled at any time after that, and it does not require any additional data or assets.
To check the status of Hotspots, use this API endpoint:
GET {{hostname}}/api/v3/models/{{model_id}}/enrichments/hotspots
The return payload will be similar to this:
{
    "enabled": true,
    "config": {}
}
To update the status, use the same endpoint, with the PATCH method:
PATCH {{hostname}}/api/v3/models/{{model_id}}/enrichments/hotspots
The request body will contain the desired status for this Enrichment:
{
  "enabled": false
}
Explainability
With Explainability enabled, Arthur is able to provide explanations for each inference. This data is also used for Global Explainability (feature importance, etc). This capability requires Arthur to be able to generate predictions on demand, which means Arthur needs a working model that can be called at any time.
Because of that, there are a number of assets required to enable Explainability, including the model assets, and a python function that can call the model's predict function and return the probability arrays.
Also, some Explainability assets need to be generated by the Arthur SDK, which makes the SDK a required part of the Explainability process.
Arthur uses LIME or SHAP, which are industry accepted algorithms, to produce explanations. This means that the Explainability assets will be python-based. These algorithms will be packaged in an Explainer object, that must be created with the Arthur SDK. This Explainer is uploaded as part of the call to enable Explainability.
In order to enable Explainability for a model, the following assets and files are required:
user_project.zipfile- This is a zip file that contains all required model assets, and an 'entrypoint' file
- The model assets include anything required to create a prediction: .pkl files, tokenizers, etc. Arthur must be able to generate a prediction from the inference data received.
- The entrypoint file is a python file that will run the predict() function. This is the appropriate place for any data manipulation that might be required for the input data: transformations, scaling, one-hot encoding, etc. This file must contain a predict() function and return an array of probabilities.
- The model assets must be in the root of the zip file (not in a subfolder). This is important, as it will fail to generate predictions otherwise.
user_requirements_file.txt(requirements.txt file)- This file contains a list of python requirements to run the model. Make sure it includes all pre-reqs to your model, or the entrypoint file will fail to load (with 'package not found' exceptions)
explainer.pkl- This is the Explainer object created by Arthur SDK. It will include the LIME or SHAP algorithm to produce feature importance data.
config- This is a json block with additional settings. It's the same as can be seen in the
GET /enrichmentsexample above.
- This is a json block with additional settings. It's the same as can be seen in the
Preparing the user_project zip file
Move all required model assets to a folder. Keep in mind that Arthur will automatically install the packages listed in the requirements.txt file, from a public or private repository.
In that folder, create the entrypoint.py file. This file must contain a predict() function, which Arthur will call at runtime. The predict() function will received a 2-D numpy array, where each item represents a perturbation of the original attribute input data. The default number of perturbations is 5000 (it is a configurable parameter). So the entrypoint file must be able to process an array of input elements. The expected return is a 2-D numpy array with the probability scores. The size of this array should match the size of the input data.
This is an example of entrypoint file:
import joblib
import os

from pathlib import Path

model_path = os.path.join(Path(__file__).resolve().parents[0], "credit_model.pkl")
sk_model = joblib.load(model_path)


def predict(x):
    return sk_model.predict_proba(x)[:,1]
In this case, the entrypoint file loads the model and uses the predict() function to wrap the predict_proba() function from the model. More complicated cases might require data transformation, one-hot encoding, etc. Keep in mind that the input of the predict() function will always be an array of input elements, and Arthur expects to receive as return an array of probabilities.
Next, prepare the requirements.txt file with all the necessary packages.
Finally, zip the folder, ensuring that the entrypoint.py and requirements.txt files are at the root.
Creating the explainer.pkl file
The easiest way to create this file is by using the Arthur SDK. Depending on the environment, it might be easier to use the enable_explainability() function of the SDK. Some customer environments, however, will prefer to run these functions as pure REST calls, without having to load the Arthur SDK. So the Explainability assets can be prepared in advance and then uploaded through direct REST calls.
The basic steps to create the Explainer object are:
- Connect to the Arthur instance
- Load the model definition from Arthur
- Prepare the (unzipped) user project folder, with the entrypoint and requirements files
- Load reference data (can be a small subset)
- Create a packager object using the SDK
- Extract the Explainer from the packager
- Save the Explainer to a .pkl file in the user project folder
- Save the model (regressor/classifier/etc) to a .pkl file in the user project folder
This code example walks through those steps:
connection = ArthurAI(url = url, login = login, password = password)
arthur_model = connection.get_model(model_id)

import os
project_dir = os.path.join(os.getcwd() + "/explain")

from arthurai.explainability.explanation_packager import ExplanationPackager
packager = ExplanationPackager(
    arthur_model,
    df=df_reference,
    project_directory=project_dir,
    user_predict_function_import_path='entrypoint',
    streaming_explainability_enabled=True,
    requirements_file="requirements.txt",
    explanation_algo='lime')

packager.create()

arthur_explainer = packager.explainer

# Test the Explainer by producing 1 explanation
# The input for the Explainer is a list of input values --not a dataframe
# remove non-input, prediction and ground truth attributes from this list
def get_sample(num_samples):
    sample_inf = df_reference.sample(num_samples)
    del sample_inf['pred']
    del sample_inf['gt']
    return sample_inf.values.tolist()

sample_inf = get_sample(1)
explanation = arthur_explainer.explain_tabular_lime(sample_inf)
print(explanation)


# Save Model to .pkl file
import dill as pickle
with open("./explain/model.pkl", "wb") as file:
    pickle.dump(regressor, file)

# Save Explainer to .pkl file
with open("./explain/explainer.pkl", "wb") as file:
    pickle.dump(arthur_explainer, file)
Currently, the project folder will contain the model .pkl file, the Explainer, the entrypoint, and the requirements.file. These are all the assets required to enable Explainability.
Enabling Explainability
This is the API endpoint to enable explainability:
PATCH {{hostname}}/api/v3/models/{{model_id}}/enrichments/explainability
This is a multipart/form-data call that must include the elements described above.
The following python code is an example of how this call can be configured:
headers = {
  'Arthur-Organization-ID': '{{organization_id}}',
  'Authorization': '{{access_token}}'
}

files = [
    ('user_project.zip',('explain.zip',open('./explain.zip','rb'),'application/zip')),
    ('user_requirements_file.txt',('requirements.txt',open('./explain/requirements.txt','rb'),'text/plain')),
    ('explainer.pkl',('explainer.pkl',open('./explain/explainer.pkl','rb'),'application/octet-stream'))
]

payload = {
    'config': '{"enabled": true, "config":{"python_version": "3.8","sdk_version": "3.25.0","streaming_explainability_enabled": true,"user_predict_function_import_path": "entrypoint","shap_expected_values": [0],"model_server_cpu": "2","model_server_memory": "1500Mi","model_server_max_replicas": 30,"explanation_nsamples": 2000,"explanation_algo": "lime","inference_consumer_cpu": "500m","inference_consumer_memory": "512Mi","inference_consumer_score_percent": 1,"inference_consumer_thread_pool_size": 5}}'
}

exp_response = session.request("PATCH", f'{url}/models/{model_id}/enrichments/explainability',
                               headers = headers,
                               data = payload,
                               files = files)
The expected response is an "ok" string.
In the backend, Arthur will provision a model server, which will be able to provide explanations on demand. This process should take a few minutes to complete.
Appendix: Sending Inferences
Once the model is saved to Arthur and all enrichments are enabled, everything should be ready to receive and process inference data.
Inferences can be sent to Arthur in several different ways: individually or in batches; in JSON format or as parquet, and when using the Arthur SDK, directly as pandas dataframes.
When sending inference data, the following information is required:
- Inference timestamp
- Inference ID
- Inference data (all input values)
- Non-input data (optional, but it cannot be uploaded after the fact)
- Prediction attributes
Optionally, ground truth data can also be sent (when available).
This is a JSON payload example sending 2 inferences:
payload = json.dumps([
  {
    "partner_inference_id": "inf_" + str(uuid.uuid4()),
    "inference_timestamp": "2023-06-07T12:00:13.656449Z",
    "inference_data": {
      "input_1": 1000,
      "input_2": "ABDC1234",
      "input_3": 9999,
      "pred" : 0.85
    },
    "ground_truth_timestamp": "2023-06-07T12:00:13.656449Z",
    "ground_truth_data": {
      "gt": 1
    }
  },
  {
    "partner_inference_id": "inf_" + str(uuid.uuid4()),
    "inference_timestamp": "2023-05-07T12:01:13.656449Z",
    "inference_data": {
      "input_1": 2000,
      "input_2": "ABDC12345",
      "input_3": 8888,
      "pred" : 0.65
    },
    "ground_truth_timestamp": "2022-05-07T12:01:13.656449Z",
    "ground_truth_data": {
      "gt": 0
    }
  }
])
PS: for batch models, the batch_id parameter is required.
In this example, ground truth data is being sent along with inference data. Arthur supports uploading ground truth data at any moment after receiving the inference data.
This is the API endpoint that can be used to send inferences in JSON format:
POST {{hostname}}/api/v3/models/{{model_id}}/inferences
Sending inferences as parquet files
A different API endpoint is available to process inferences in parquet files:
POST {{hostname}}/api/v3/models/{{model_id}}/inferences/file
The parquet file must contain the headers, as well as the timestamps and inference IDs:
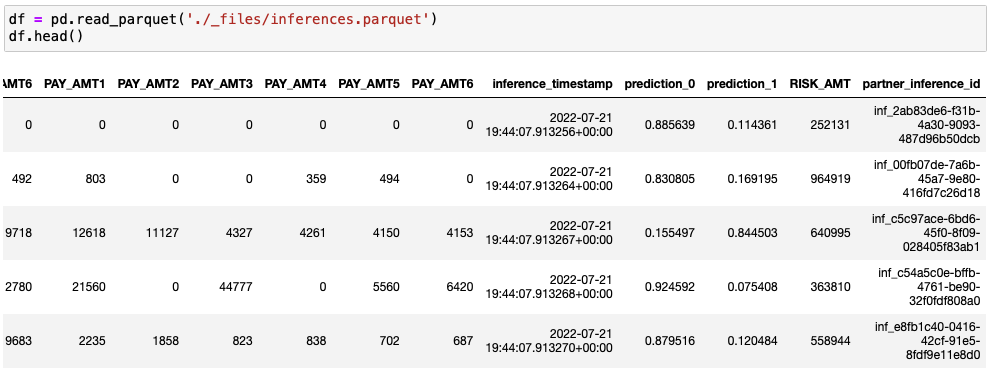
In this case, the parquet file does not contain ground truth data.
The file must be attached to the request as inference_data, as shown in the following example:
files = [
  ('inference_data',('data.parquet', open('./data.parquet','rb'), 'application/octet-stream'))
]
Uploading Ground Truth Data
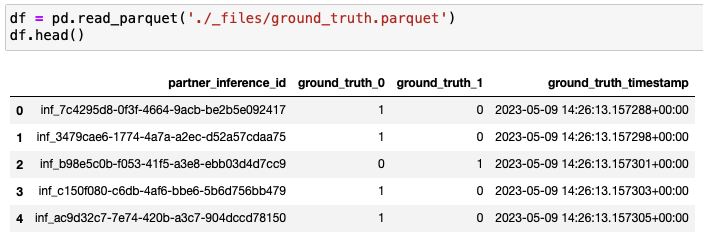
When uploading ground truth data, only the ground truth timestamp, ground truth attributes, and inference IDs are required. The inference IDs must match the existing inferences:
The endpoint to upload ground truth data is the same one used to upload inference data:
POST {{hostname}}/api/v3/models/{{model_id}}/inferences/file
The difference will be that the file should be sent as ground_truth_data, instead of inference_data:
files = [
  ('ground_truth_data',('gt.parquet', open('./gt.parquet','rb'), 'application/octet-stream'))
]
Updated over 1 year ago