SSO & Identity Provider Setup
Enterprise deployments only: SSO integration is available exclusively on enterprise deployments. If your organization does not have an enterprise deployment, see Authentication for standard login options.
How do you configure Arthur to authenticate users through your organization's identity provider (Okta, Azure AD, or any OIDC/SAML provider)? Arthur uses Keycloak as its internal identity broker, which means you connect your IdP to Keycloak once — and all Arthur users then authenticate through your organization's existing SSO flow. This page walks you through every step: choosing a protocol, configuring your IdP, mapping user attributes, and troubleshooting the redirect URI mismatches that cause the majority of SSO failures.
Overview
Arthur's authentication layer is built on Keycloak, an open-source identity and access management solution. Keycloak acts as a Service Provider (SP) that federates authentication to your external Identity Provider (IdP). This architecture means:
- Arthur never stores or validates passwords directly — your IdP owns credentials.
- You can connect any OIDC 1.0 or SAML 2.0 compliant IdP, including Okta, Azure Active Directory, Google Workspace, PingFederate, and OneLogin.
- Users who authenticate via SSO are automatically provisioned in Arthur on first login.
- Group memberships and role assignments can be driven by IdP attributes.
sequenceDiagram
    participant U as User (Browser)
    participant A as Arthur UI
    participant K as Keycloak (Arthur)
    participant I as Your IdP (Okta / Azure AD)

    U->>A: Navigate to Arthur
    A->>K: Redirect to Keycloak login
    K->>I: Redirect to IdP (OIDC/SAML)
    I->>U: Prompt for credentials
    U->>I: Enter credentials + MFA
    I->>K: Return token / assertion
    K->>A: Issue Arthur session token
    A->>U: Authenticated — load dashboard
Self-hosted vs. Arthur Cloud: If you are on Arthur Cloud, contact your Arthur account team to initiate IdP configuration — some steps below are performed by Arthur's platform team on your behalf. Self-hosted customers have direct Keycloak admin access and can follow all steps independently.
OIDC vs SAML — Which to Use
Both protocols are fully supported. Use the table below to choose:
| Consideration | OIDC (OpenID Connect) | SAML 2.0 |
|---|---|---|
| Protocol age | Modern (2014) | Established (2005) |
| Token format | JSON Web Token (JWT) | XML assertion |
| Typical use | Cloud-native apps, mobile | Enterprise, legacy systems |
| Okta support | ✅ Native OIDC app | ✅ SAML app |
| Azure AD support | ✅ App registration | ✅ Enterprise application |
| Attribute mapping | Claims in JWT payload | Attributes in XML assertion |
| IDP-initiated SSO | Limited (non-standard) | Native support |
| Recommended for Arthur | ✅ Preferred | ✅ Use if OIDC unavailable |
Recommendation: Use OIDC unless your security policy mandates SAML or your IdP does not support OIDC. OIDC is simpler to configure and debug.
Prerequisites
Before you begin, confirm you have the following:
- Arthur admin access — You need the
org-adminrole in Arthur to access Keycloak configuration, or coordinate with your Arthur platform administrator. - Keycloak admin console access — Available at
https://<your-arthur-domain>/auth/admin/. Your Arthur deployment credentials are required. - IdP admin access — You need permission to create applications/integrations in Okta, Azure AD, or your chosen IdP.
- Arthur base URL — Know your Arthur deployment URL (e.g.,
https://arthur.yourcompany.com). All redirect URIs are derived from this. - User attribute values — Confirm which IdP attributes carry
email,firstName, andlastNamefor your users. These vary by IdP and directory configuration.
Note: Write down your Arthur base URL before starting. An incorrect base URL in redirect URI fields is the single most common cause of SSO failures.
Configure OIDC with Okta
This section uses Okta as the worked example. The same parameters apply to Azure AD and other OIDC providers — see the generic parameter mapping table at the end of this section.
Step 1 — Create an OIDC Application in Okta
-
Sign in to your Okta Admin Console.
-
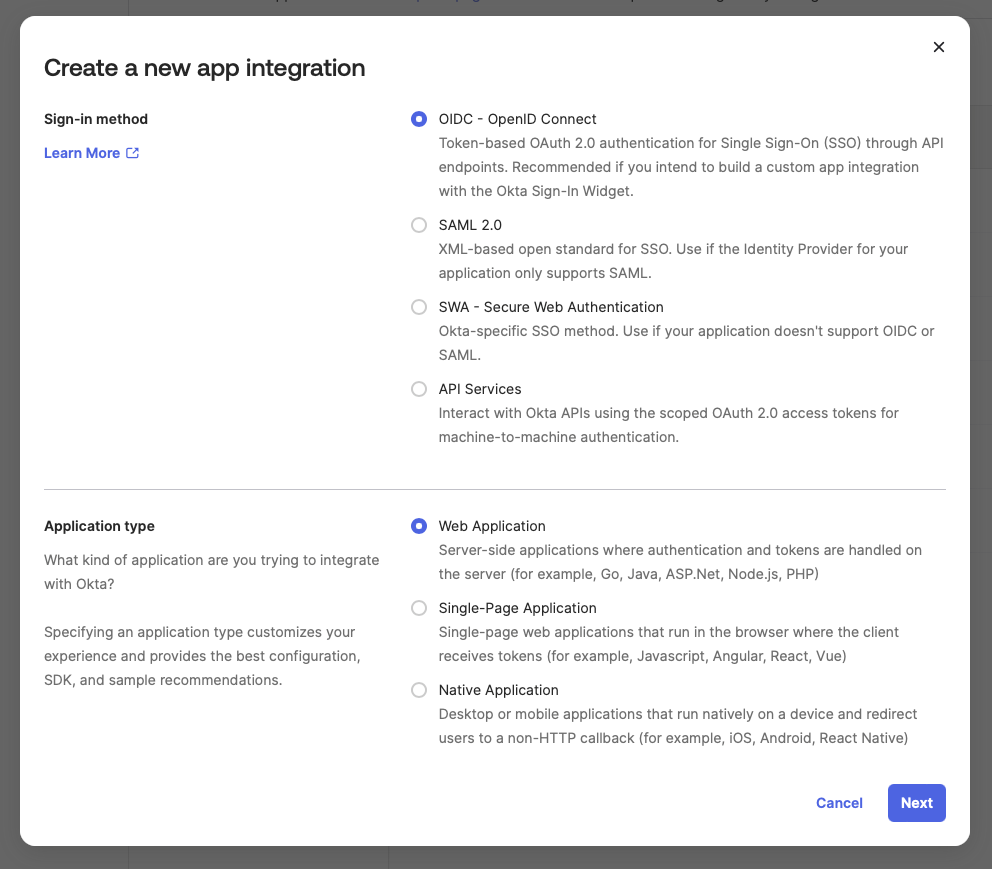
Navigate to Applications → Applications → Create App Integration.
-
Select OIDC - OpenID Connect as the sign-in method.
-
Select Web Application as the application type.
-
Click Next.
-
Configure the application settings:
Field Value App integration name Arthur AI(or your preferred name)Grant type Authorization Code ✅ Sign-in redirect URIs https://<your-arthur-domain>/auth/realms/arthur/broker/okta-oidc/endpointSign-out redirect URIs https://<your-arthur-domain>/auth/realms/arthur/broker/okta-oidc/endpoint/logout_responseControlled access Assign to the groups or people who should access Arthur Critical: The redirect URI must match exactly — including protocol (https), domain, path, and trailing characters. A single character difference causes aredirect_uri_mismatcherror. See Troubleshoot SSO Issues. -
Click Save.
-
On the application's General tab, copy the Client ID and Client Secret. You will need these in Step 3.
-
Note your Okta domain (e.g.,
https://yourorg.okta.com). The OIDC discovery URL will be:https://yourorg.okta.com/.well-known/openid-configuration.
Step 2 — Open the Keycloak Admin Console
- Navigate to
https://<your-arthur-domain>/auth/admin/. - Log in with your Keycloak admin credentials.
- Confirm you are in the
arthurrealm (visible in the top-left dropdown). Do not make changes in themasterrealm.
Step 3 — Add Okta as an Identity Provider in Keycloak
-
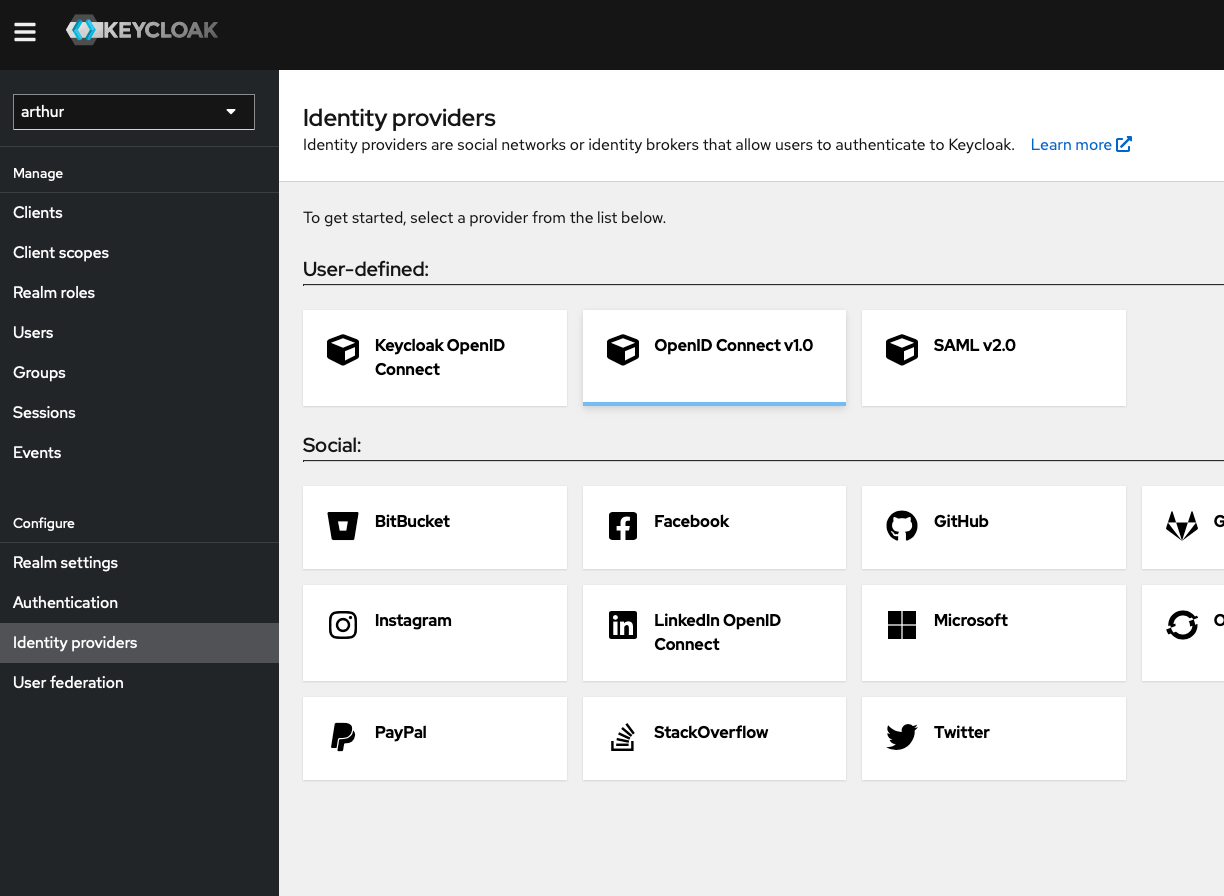
In the left sidebar, click Identity Providers.
-
Click Add provider and select OpenID Connect v1.0.
-
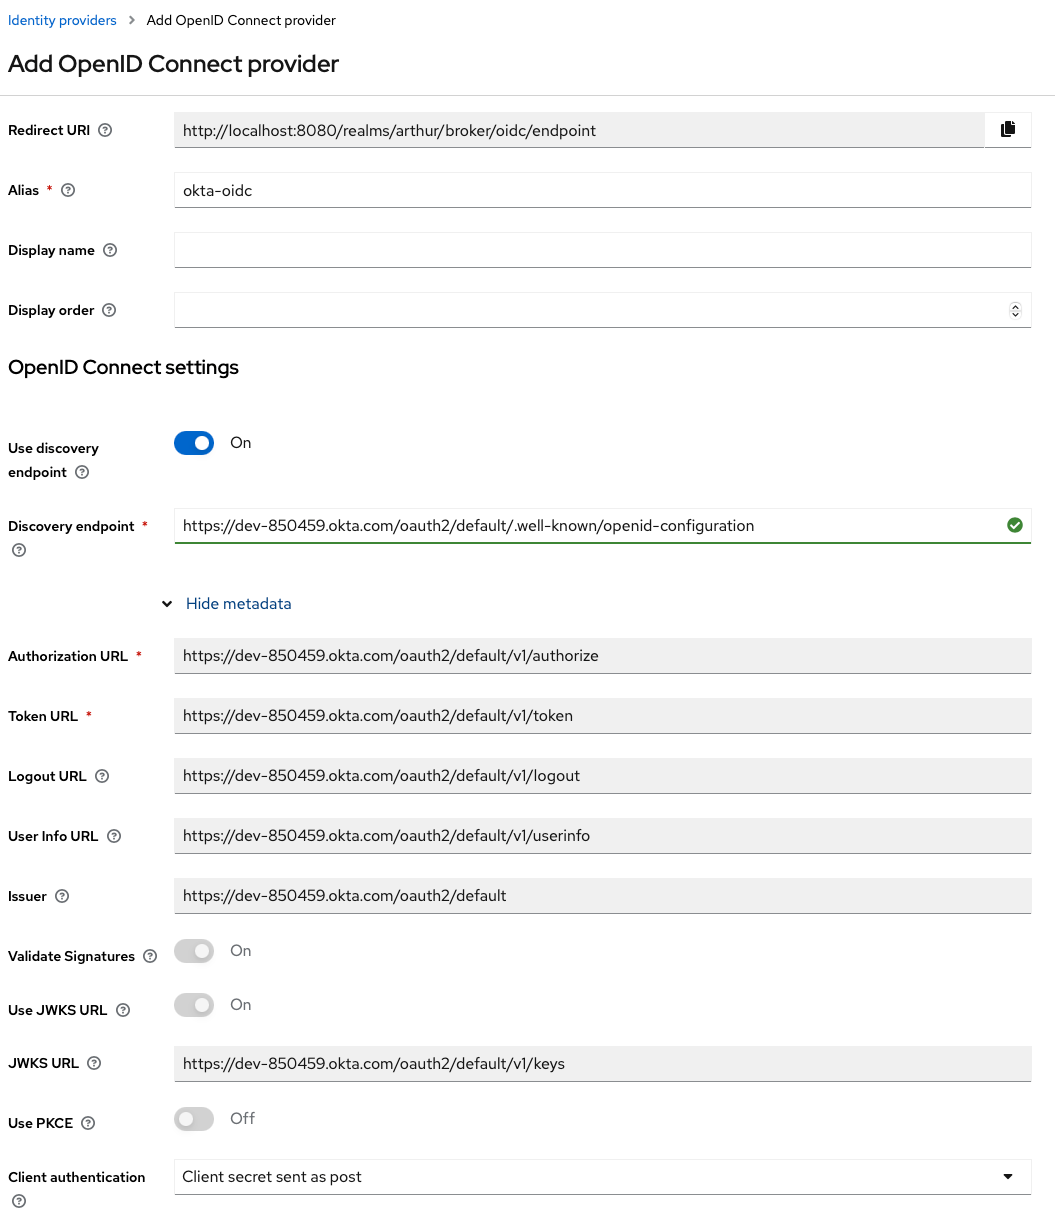
Fill in the provider settings:
Field Value Alias okta-oidc(must match the alias used in your redirect URI)Display Name Sign in with OktaDiscovery Endpoint https://yourorg.okta.com/.well-known/openid-configurationClient ID Paste the Client ID from Okta Step 1 Client Secret Paste the Client Secret from Okta Step 1 Default Scopes openid email profileStore Tokens ON (recommended for token refresh) Sync Mode FORCE(ensures attributes stay current on each login) -
Click Save.
Alias matters: The alias you set here (
okta-oidcin this example) is embedded in the Keycloak redirect URI. If you change the alias after configuring Okta, you must update the redirect URI in Okta to match.
Step 4 — Verify the Redirect URI
After saving, Keycloak displays the Redirect URI it generated for this provider. Confirm it matches exactly what you entered in Okta:
https://<your-arthur-domain>/auth/realms/arthur/broker/okta-oidc/endpointCopy this value and verify it in your Okta application's Sign-in redirect URIs list.
Step 5 — Test the OIDC Connection
- Open a private/incognito browser window.
- Navigate to
https://<your-arthur-domain>. - On the Keycloak login page, you should see a "Sign in with Okta" button.
- Click it and complete authentication in Okta.
- You should be redirected back to Arthur and logged in.
Generic OIDC Parameter Mapping (Azure AD and Others)
If you are using Azure AD or another OIDC provider, substitute the following values:
| Parameter | Okta | Azure AD | Generic OIDC | |
|---|---|---|---|---|
| Discovery Endpoint | https://<okta-domain>/.well-known/openid-configuration | https://login.microsoftonline.com/<tenant-id>/v2.0/.well-known/openid-configuration | Provider's /.well-known/openid-configuration URL | |
| Client ID | Okta App Client ID | Azure App Registration Application (client) ID | Provider's client/app ID | |
| Client Secret | Okta App Client Secret | Azure App Registration client secret value | Provider's client secret | |
| Scopes | openid email profile | openid email profile | At minimum: openid email | |
| Redirect URI format | …/broker/<alias>/endpoint | …/broker/<alias>/endpoint | …/broker/<alias>/endpoint |
For Azure AD, you also need to:
- Register Arthur as an application under Azure Active Directory → App registrations → New registration.
- Set the redirect URI type to Web.
- Under Certificates & secrets, create a new client secret and copy the value immediately (it is only shown once).
- Under API permissions, ensure
openid,email, andprofiledelegated permissions are granted.
Configure SAML 2.0 with Okta
Use this path if your organization requires SAML or if OIDC is not available.
Step 1 — Create a SAML Application in Okta
-
In the Okta Admin Console, navigate to Applications → Applications → Create App Integration.
-
Select SAML 2.0 as the sign-in method.
-
Click Next.
-
Set the App name to
Arthur AIand click Next. -
Configure SAML settings:
Field Value Single sign-on URL https://<your-arthur-domain>/auth/realms/arthur/broker/okta-saml/endpointAudience URI (SP Entity ID) https://<your-arthur-domain>/auth/realms/arthurName ID format EmailAddressApplication username EmailResponse Signed Assertion Signature Signed Signature Algorithm RSA-SHA256Digest Algorithm SHA256Assertion Encryption Optional (configure if your security policy requires it) -
Under Attribute Statements, add the following (see Attribute Mapping for details):
Name Name Format Value firstNameBasic user.firstNamelastNameBasic user.lastNameemailBasic user.email -
Click Next, complete the feedback form, and click Finish.
-
On the application's Sign On tab, click View SAML setup instructions or download the Identity Provider metadata XML. You will need the IdP SSO URL, IdP Issuer, and X.509 Certificate.
Step 2 — Add Okta as a SAML Identity Provider in Keycloak
-
In the Keycloak admin console (
https://<your-arthur-domain>/auth/admin/), navigate to Identity Providers. -
Click Add provider and select SAML v2.0.
-
Fill in the provider settings:
Field Value Alias okta-saml(must match the alias in your SAML SSO URL)Display Name Sign in with OktaImport from URL Paste Okta's metadata URL, or use Import from file with the downloaded XML Service Provider Entity ID https://<your-arthur-domain>/auth/realms/arthurSingle Sign-On Service URL Okta's IdP SSO URL (from setup instructions) Single Logout Service URL Okta's IdP SLO URL (if available) Validating X509 Certificates Paste the X.509 certificate from Okta NameID Policy Format EmailPrincipal Type Subject NameIDSync Mode FORCE -
Click Save.
Step 3 — Download the Keycloak SP Metadata
After saving, Keycloak generates Service Provider metadata that you can provide back to Okta for verification:
https://<your-arthur-domain>/auth/realms/arthur/broker/okta-saml/endpoint/descriptorYou can import this URL into Okta under the application's Sign On settings if needed.
Step 4 — Test the SAML Connection
Follow the same test procedure as OIDC Step 5 — open a private browser, navigate to Arthur, and use the "Sign in with Okta" button.
Attribute Mapping
Arthur requires three user attributes to create and display user profiles correctly. You must configure mappers in Keycloak to extract these from your IdP's token or assertion.
Required Attributes
| Arthur Field | OIDC Claim (typical) | SAML Attribute (typical) | Okta Default |
|---|---|---|---|
email | email or urn:oid:0.9.2342.19200300.100.1.3 | user.email | |
| First Name | given_name | firstName | user.firstName |
| Last Name | family_name | lastName | user.lastName |
Azure AD note: Azure AD uses
given_nameandfamily_nameas OIDC claims by default. If these are missing, check that theprofilescope is included and that the user's profile is populated in Azure AD.
Configuring Attribute Mappers in Keycloak
For each Identity Provider you configure, you need to add mappers that translate IdP claims/attributes into Keycloak user profile fields.
- In the Keycloak admin console, go to Identity Providers → [your provider] → Mappers.
- Click Add mapper for each of the following:
Email mapper:
| Field | Value |
|---|---|
| Name | email-mapper |
| Sync Mode Override | Inherit |
| Mapper Type | Attribute Importer |
| Attribute (OIDC: Claim, SAML: Attribute Name) | email |
| User Attribute Name | email |
First Name mapper:
| Field | Value |
|---|---|
| Name | firstname-mapper |
| Sync Mode Override | Inherit |
| Mapper Type | Attribute Importer |
| Attribute (OIDC: Claim, SAML: Attribute Name) | given_name (OIDC) or firstName (SAML) |
| User Attribute Name | firstName |
Last Name mapper:
| Field | Value |
|---|---|
| Name | lastname-mapper |
| Sync Mode Override | Inherit |
| Mapper Type | Attribute Importer |
| Attribute (OIDC: Claim, SAML: Attribute Name) | family_name (OIDC) or lastName (SAML) |
| User Attribute Name | lastName |
- Click Save after each mapper.
Verifying Attribute Mapping
After a test login, you can verify that attributes were mapped correctly:
- In the Keycloak admin console, go to Users.
- Find the user who just logged in via SSO.
- Click their username and check the Details tab —
Email,First name, andLast nameshould be populated. - If any field is blank, the corresponding mapper is misconfigured or the IdP is not sending that attribute.
Automatically redirect users to your IdP
By default, Keycloak shows your IdP as one of several login options. To send users straight to your IdP (e.g. Okta):
- In Keycloak: Authentication → Browser.
- Click the gear icon next to Identity Provider Redirector.
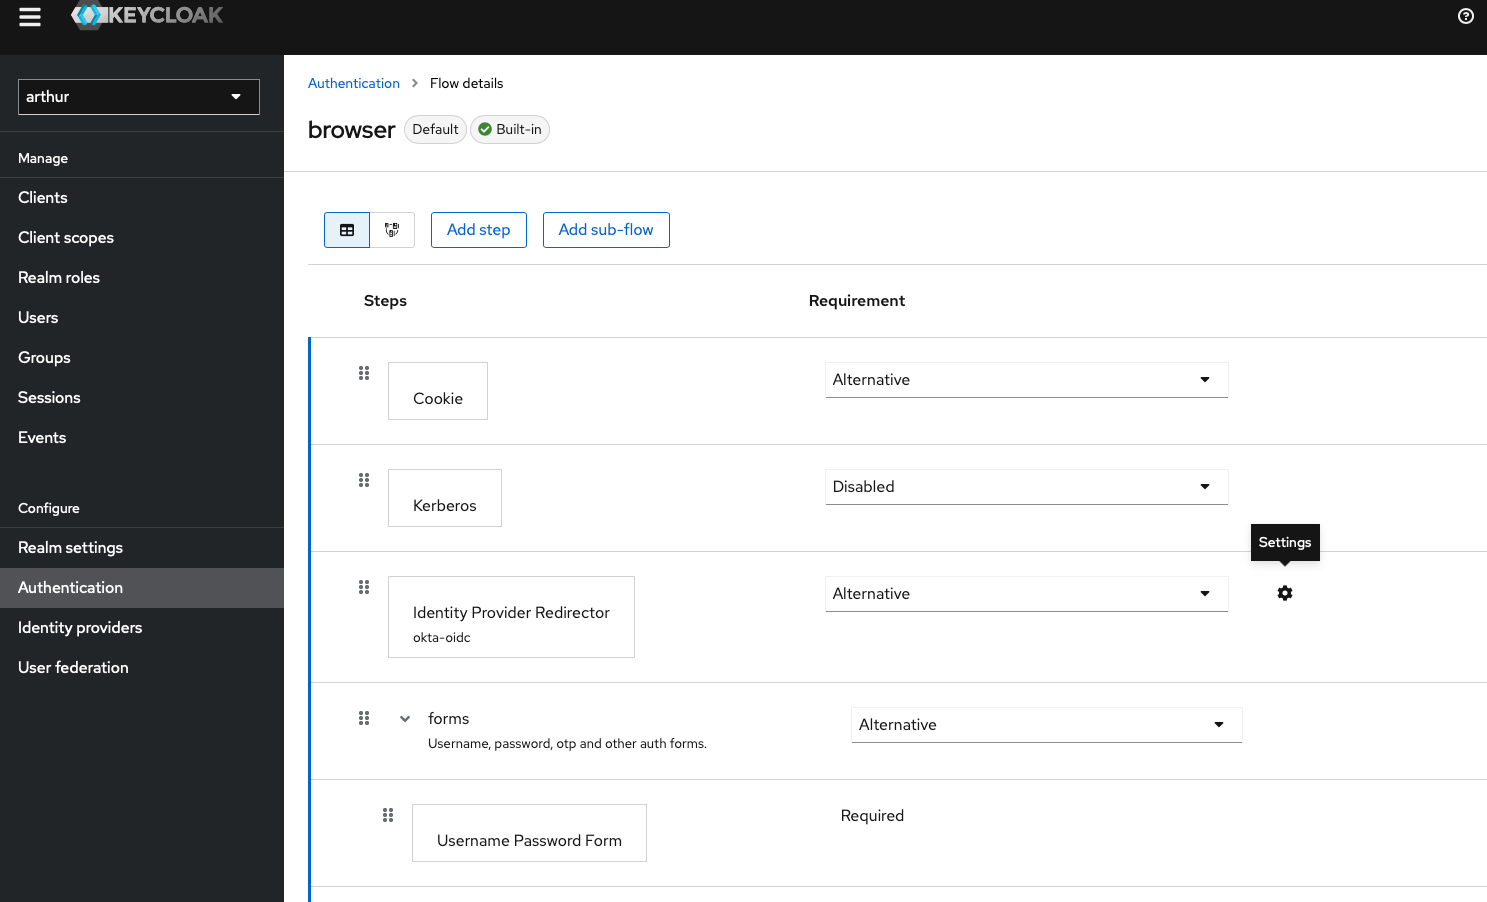
- Add a config (alias) and set Default Identity Provider to your IdP’s alias (e.g.
okta-oidcorokta-saml). Save.
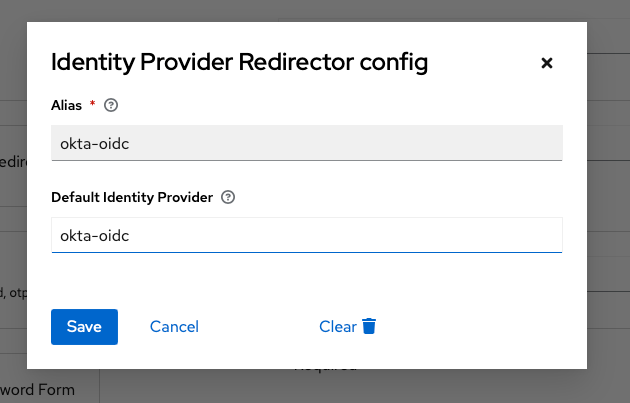
- On the next Arthur login, users will be sent directly to your IdP. (Sign out of the IdP first if you want to see the full redirect.)
Automatic Org Enrollment
By default, users who authenticate via SSO are created in Keycloak but are not automatically assigned to an Arthur organization. You can configure automatic enrollment by linking your email domain to an organization in Keycloak.
- In the Keycloak admin console, go to Organizations and select your organization (e.g.,
arthur). - Add your organization's email domain (e.g.,
yourcompany.com). - Go to Organizations → Identity Providers and link your IdP to the organization with the correct domain and settings.
Users whose email matches the registered domain are automatically enrolled in the organization on first login.
Access Control with IdP Groups (RBAC)
Once SSO is working, you can drive Arthur access directly from your IdP's groups. Users in certain IdP groups are automatically treated as members of the corresponding Arthur groups — and receive the associated roles — without needing manual invites in Arthur.
How It Works
- You define groups in your IdP (e.g.,
Arthur Admins,Arthur Viewers). - Arthur admins create matching groups in Arthur and assign roles to those groups.
- Each Arthur group is linked to an IdP group name. When a user signs in, their IdP group memberships are passed via a token claim (
arthur_idp_groups). Arthur uses that claim to evaluate group membership at access time.
Access updates on next login. Revoking a user from an IdP group takes effect the next time they sign in. Users who receive access only via IdP groups may not appear in the Arthur UI's group member list — membership is evaluated from the token.
Step 1 — Configure Your IdP to Send Group Memberships
OIDC (Okta example): Configure a groups claim in your Okta authorization server so group names are included in the ID token. Refer to Okta's documentation on customizing token claims.
SAML (Okta example): In your Arthur SAML application, add a Group Attribute Statement:
| Name | Value |
|---|---|
groups | Group names matching your Arthur groups (e.g., filter by prefix Arthur) |
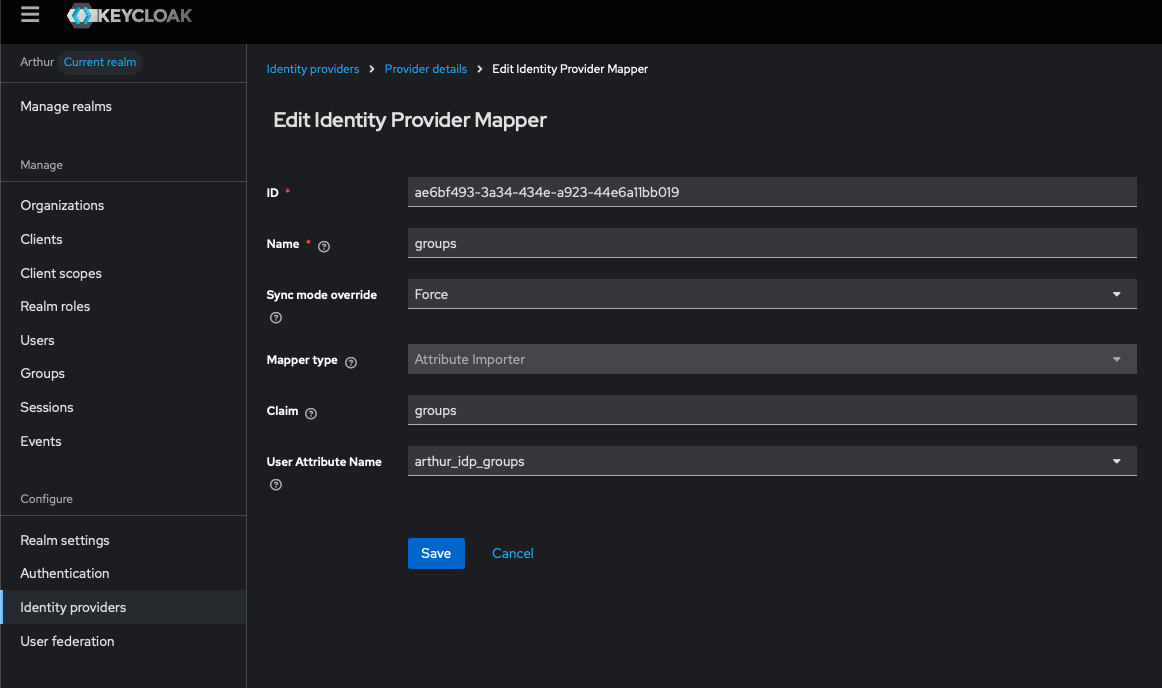
Step 2 — Map IdP Groups into Keycloak
Add a mapper to your Identity Provider in Keycloak that reads the IdP's group claim and writes it to the arthur_idp_groups user attribute.
OIDC/SAML:
- Go to Identity Providers → [your OIDC/SAML provider] → Mappers → Add mapper.
- Set Mapper Type to
Attribute Importer. - Set Claim to
groups(or whichever claim your IdP sends). - Set User Attribute Name to
arthur_idp_groups. - Set Sync Mode Override to
Force.
After a user signs in, their Keycloak profile should show arthur_idp_groups populated with the group names sent by the IdP.
Step 3 — Link Arthur Groups to IdP Groups
In the Arthur Platform, create a group and assign it the appropriate roles. Set the group's IdP Group Mapping Name to the exact group name sent by the IdP (e.g., Arthur Admins). Users whose token contains that group name are automatically treated as members of the Arthur group on sign-in.
Troubleshoot SSO Issues
The following issues account for the vast majority of SSO configuration problems.
Issue 1 — redirect_uri_mismatch (Most Common)
redirect_uri_mismatch (Most Common)Symptom: After authenticating in your IdP, you are redirected back to an error page that says redirect_uri_mismatch or The redirect URI in the request did not match.
Cause: The redirect URI that Keycloak sends to your IdP does not exactly match any URI registered in your IdP application.
Resolution:
-
In the Keycloak admin console, go to Identity Providers → [your provider] and copy the Redirect URI shown at the top of the page.
-
In your IdP (e.g., Okta), open the Arthur application and verify the Sign-in redirect URIs list contains this exact value.
-
Check for these common mismatches:
Problem Incorrect Correct HTTP vs HTTPS http://arthur.co/auth/...https://arthur.co/auth/...Trailing slash …/endpoint/…/endpointWrong alias …/broker/okta/endpoint…/broker/okta-oidc/endpointWrong realm …/realms/master/……/realms/arthur/…Port included …arthur.co:443/auth/……arthur.co/auth/…
Issue 2 — User Lands on Arthur but Has No Name or Email
Symptom: The user can log in but their profile shows blank name fields, or they cannot be found by email.
Cause: Attribute mappers are missing or the IdP is not sending the expected claim/attribute names.
Resolution:
- Use your IdP's token preview or SAML tracer browser extension to inspect what attributes are actually being sent.
- In Keycloak, verify that the mapper's Attribute field matches the exact claim/attribute name from the IdP (case-sensitive).
- Confirm the IdP application has the
profilescope granted (OIDC) or the attribute statements are configured (SAML).
Issue 3 — "Invalid Client" or "Unauthorized Client" Error
Symptom: The IdP returns an error immediately after Keycloak redirects to it.
Cause: The Client ID in Keycloak does not match the Client ID registered in the IdP.
Resolution:
- In Keycloak, go to Identity Providers → [your provider] and verify the Client ID field.
- In your IdP, confirm the application's Client ID matches exactly (copy-paste, do not retype).
- For OIDC, also verify the Client Secret has not been rotated in the IdP without updating Keycloak.
Issue 4 — SAML Signature Validation Failure
Symptom: Keycloak logs show SAML signature validation failed or users see a generic error after IdP authentication.
Cause: The X.509 certificate in Keycloak does not match the certificate the IdP is using to sign assertions.
Resolution:
- In Okta, go to your SAML application → Sign On tab → SAML Signing Certificates. Download the active certificate.
- In Keycloak, go to Identity Providers → [your SAML provider] → Validating X509 Certificates and replace the certificate with the newly downloaded one.
- If Okta recently rotated its signing certificate, this is the most likely cause.
Issue 5 — Users Are Not Automatically Redirected to IdP
Symptom: Users see the Keycloak login page instead of being redirected directly to the IdP.
Cause: The Identity Provider is not set as the default, or the kc_idp_hint parameter is not being used.
Resolution:
- To make your IdP the only login option, go to Authentication → Flows → Browser in Keycloak and configure the Identity Provider Redirector to use your provider as the default.
- Alternatively, distribute the direct login URL with
kc_idp_hint=<your-alias>(see IDP-Initiated SSO).
Enabling Debug Logging
For deeper investigation, enable Keycloak event logging:
- Go to Realm Settings → Events → Config.
- Enable Save Events and add
LOGIN,LOGIN_ERROR,IDENTITY_PROVIDER_LOGIN, andIDENTITY_PROVIDER_RESPONSEto the saved event types. - View events under Events → Login Events.
Summary
| Goal | What to do |
|---|---|
| SSO via OIDC | Add an OpenID Connect provider in Keycloak, create an OIDC app in your IdP, exchange Client ID/Secret and redirect URIs. |
| SSO via SAML | Add a SAML v2.0 provider in Keycloak, create a SAML app in your IdP, configure SSO URL and entity ID, then import metadata in Keycloak. |
| Auto-redirect to IdP | In Keycloak Authentication → Browser, set the Identity Provider Redirector default to your IdP alias. |
| IDP-initiated SSO | Use the kc_idp_hint parameter (OIDC) or create a SAML client in Keycloak for IDP-initiated flows (SAML). |
| Org auto-enrollment | In Keycloak Organizations, add your email domain and link the IdP to the org. |
| User profile mapping | In your IdP, send first_name, last_name, and email. In Keycloak, add Attribute Importer mappers to the Identity Provider. |
| RBAC via IdP groups | Configure your IdP to send group names, add a Keycloak mapper to populate arthur_idp_groups, and link Arthur groups to IdP group names. |
Next Steps
Now that SSO is configured, you are ready to:
- Configure Role-Based Access Control — Map IdP groups to Arthur workspace and project roles so users automatically receive the right permissions.
- Invite Users to Workspaces — Add SSO-authenticated users to specific Arthur workspaces and assign them roles.
- Set Up Multi-Factor Authentication — If your IdP enforces MFA, it applies automatically to Arthur logins. You can also configure MFA policies within Keycloak as a fallback.
- Audit Login Events — Review authentication events and failed login attempts in the Arthur audit log.
- Configure Session Timeouts — Set idle and maximum session durations to align with your organization's security policy.
Need help? If you are on Arthur Cloud or an enterprise plan, contact [email protected] with your Arthur domain, IdP type, and a description of the error. Include the Keycloak event log entries if available — they contain the specific error codes needed to diagnose most SSO issues quickly.
Updated 2 months ago