
Guardrails Quickstart
Add prompt and response validation to an existing LLM application
This guide integrates GenAI Engine guardrails into an application you already have. The engine's validation API is called before and after your LLM call, which breaks the flow into four steps:
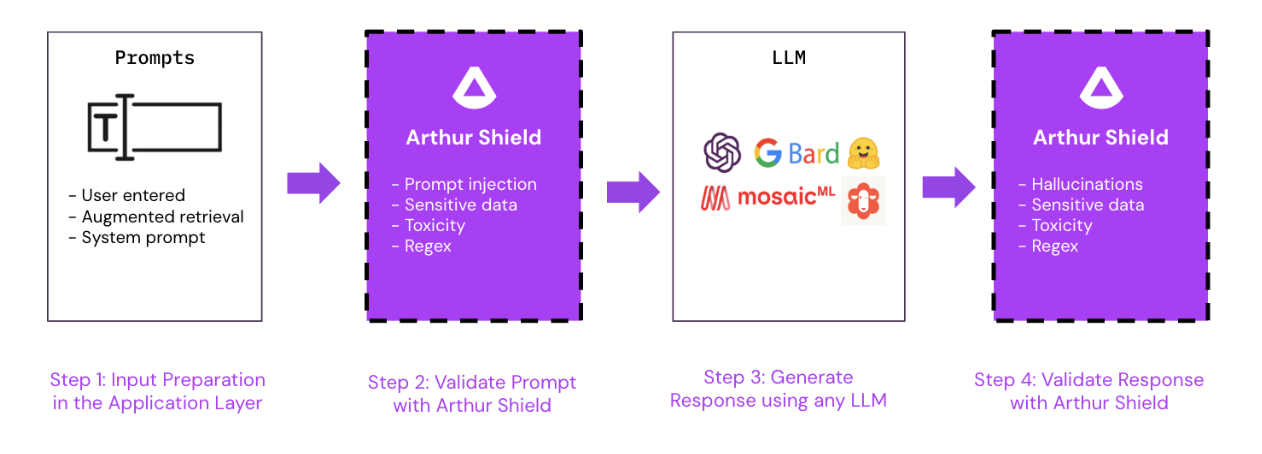
The examples below use http://localhost:3030 as the engine hostname, matching a local Docker Compose deployment. Replace it with the hostname of your instance.
Prerequisites
A running GenAI Engine
You need an engine instance at a hostname your application can reach. The Deployment Guide for Arthur GenAI Engine covers Docker Compose; Deployment with AWS and Deployment with Kubernetes cover production options.
Every request needs an API key in the Authorization header. See Authentication and API Keys Management. The interactive API reference for your instance is at {hostname}/docs.
A configured model provider
The hallucination and sensitive data rules call an LLM. If you plan to enable either, configure a provider first; see Configure Model Provider. The other rules run on models bundled with the engine and need no provider.
Default rules
The engine starts with no rules enabled. Teams get value by choosing which rules to turn on and tuning them for their organization and use cases.
Default rules exist globally within an engine instance and are applied to every existing task and every task created later. We recommend creating a few default rules to start. The Rule Configuration Guide explains how.
Step 0: Create a task
A task is a conceptual use case, typically one LLM application, under which you group and manage a set of rules. Create one through the API or the UI; see Create Task for the UI flow.
POST {hostname}/api/v2/tasks
curl -X POST "http://localhost:3030/api/v2/tasks" \
  -H "Authorization: Bearer {API_KEY}" \
  -H "Content-Type: application/json" \
-d '{ "name": "Returns Assistant" }'{
"name": "Returns Assistant"
}Hold on to the id in the response. You will need it for every validation call.
When a task is created, all existing default rules are automatically applied to it. You can see which rules were applied in the rules field of the response.
{
  "id": "f29c9876-4528-425e-934d-eca2c9633a18",
  "name": "Returns Assistant",
  "created_at": 1709316477693,
  "updated_at": 1709316477693,
  "rules": [
    {
      "id": "4c547448-5edc-4f9d-80e7-1c1ed5e8eed5",
      "name": "Blocked keywords",
      "type": "KeywordRule",
      "apply_to_prompt": true,
      "apply_to_response": true,
      "enabled": true,
      "scope": "default",
      "created_at": 1709316477693,
      "updated_at": 1709316477693,
      "config": {
        "keywords": ["key_word_1", "key_word_2"]
      }
    }
  ]
}
Once the task exists, you can create rules that apply only to it with POST /api/v2/tasks/{task_id}/rules, and enable or disable any rule for it (including default rules) with PATCH /api/v2/tasks/{task_id}/rules/{rule_id}. The Rule Configuration Guide covers both.
Step 1: Prepare the prompt
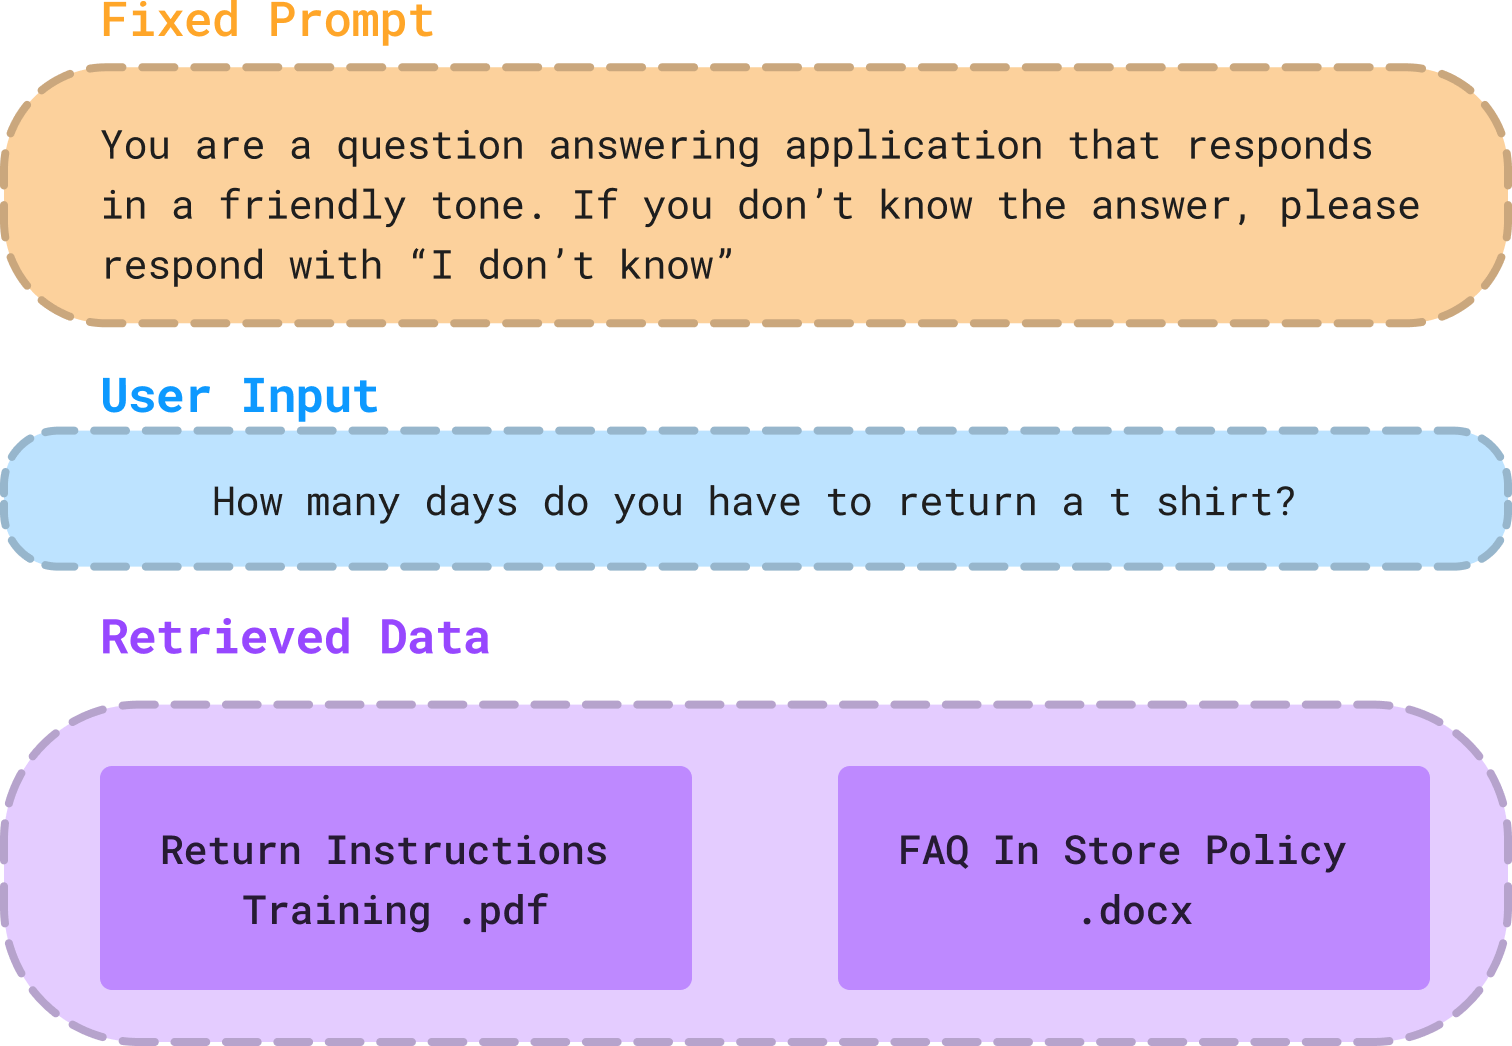
The first step in your application's workflow is to build the prompt that will be sent to the LLM. A prompt usually has these parts:
- Fixed prompt. The part that is the same for every call. This is where the application sets instructions for how the model should behave.
- Dynamically added text. The part that changes per request:
- User input. In a chat application, the text the end user typed. In other applications, the unique input to the LLM at inference time.
- Retrieved data. Relevant information the model should use to complete the task, often passages pulled from a document store by a retrieval step.
To compare prompt variants before you commit to one, see Prompt Experiments.
Step 2: Validate the prompt
Before the prompt goes to the LLM, check that it is safe to send by calling validate_prompt.
POST {hostname}/api/v2/tasks/{task_id}/validate_prompt
The task_id is the one from Step 0.
curl -X POST "http://localhost:3030/api/v2/tasks/{task_id}/validate_prompt" \
  -H "Authorization: Bearer {API_KEY}" \
  -H "Content-Type: application/json" \
-d '{ "prompt": "How many days do you have to return a t-shirt?" }'{
"prompt": "How many days do you have to return a t-shirt?",
"conversation_id": "conv-8f2a",
"user_id": "user-1234"
}Only prompt is required.
- prompt: the text to validate. You choose which parts of the prompt from Step 1 to include. We recommend passing only the user input, since that is the part that can carry malicious or sensitive content. Leaving out the fixed prompt reduces noise and lets the rules focus on what the user actually sent.
- conversation_id (optional): an ID that groups the prompts and responses of one conversation so it can be reconstructed later.
- user_id (optional): the end user this prompt belongs to.
Typically a task validates prompts with rules for:
- Prompt injection
- PII or sensitive data leakage
- Forbidden words, topics, or phrases
- Toxicity
The endpoint runs every prompt-side rule enabled for the task and returns one entry per rule in rule_results.
{
  "inference_id": "4dd1fae1-34b9-4aec-8abe-fe7bf12af31d",
  "rule_results": [
    {
      "id": "e5ee86e1-8369-4eca-83bd-577668fc3208",
      "name": "Blocked keywords",
      "rule_type": "KeywordRule",
      "scope": "default",
      "result": "Pass",
      "latency_ms": 3,
      "details": {
        "message": "No keywords found in text.",
        "keyword_matches": []
      }
    },
    {
      "id": "cd1f8027-cdfb-4a2d-9ec2-e483f9259746",
      "name": "Prompt injection",
      "rule_type": "PromptInjectionRule",
      "scope": "task",
      "result": "Pass",
      "latency_ms": 41
    }
  ]
}
Save the inference_id. It links the response validation in Step 4 back to this prompt.
Your application decides what happens nextThe engine does not block the prompt or interact with the end user. Your code must read
rule_resultsand decide whether to send the prompt to the LLM or take another action. Depending on the use case and which rule failed, teams either stop the request and return a default message, or let it continue and record the event for review.
Step 3: Generate a response
Once the prompt passes validation, format it and send it to your LLM. To compare how different models or prompt versions perform on your use case, see LLM Evaluators and Prompt Experiments.
Step 4: Validate the response
After the LLM returns, check that the response is safe to show the user by calling validate_response.
POST {hostname}/api/v2/tasks/{task_id}/validate_response/{inference_id}
The task_id is from Step 0 and the inference_id is from the validate_prompt response in Step 2.
curl -X POST "http://localhost:3030/api/v2/tasks/{task_id}/validate_response/{inference_id}" \
  -H "Authorization: Bearer {API_KEY}" \
  -H "Content-Type: application/json" \
  -d '{
    "response": "Yes, you can return all unworn clothing items within 30 days for a full refund.",
    "context": "<Excerpts from the returns policy document>"
}'{
"response": "Yes, you can return all unworn clothing items within 30 days for a full refund.",
"context": "<Excerpts from the returns policy document>",
"model_name": "gpt-4o"
}- response (required): the text generated by the LLM in Step 3.
- context (optional): the retrieved data from Step 1. This field is required for the hallucination rule. If a hallucination rule is enabled and no context is provided, that rule returns
Skipped. Include context whenever you have it. - model_name (optional): the model that produced the response, recorded with the inference for later analysis.
Typically a task validates responses with rules for:
- Hallucination
- PII or sensitive data leakage
- Forbidden words, topics, or phrases
- Toxicity
{
  "inference_id": "4dd1fae1-34b9-4aec-8abe-fe7bf12af31d",
  "rule_results": [
    {
      "id": "94ebc731-1e50-4bf7-a7ba-9bfd645d0323",
      "name": "Toxicity",
      "rule_type": "ToxicityRule",
      "scope": "default",
      "result": "Pass",
      "latency_ms": 58,
      "details": {
        "message": "No toxicity detected!",
        "toxicity_score": 0.00017,
        "toxicity_violation_type": "benign"
      }
    },
    {
      "id": "22af5293-b2fd-4dad-a418-47ce2c9b729a",
      "name": "Hallucination",
      "rule_type": "ModelHallucinationRuleV2",
      "scope": "task",
      "result": "Pass",
      "latency_ms": 1420,
      "details": {
        "score": true,
        "message": "All claims were supported by the context!",
        "claims": [
          {
            "claim": "Yes, you can return all unworn clothing items within 30 days for a full refund.",
            "valid": true,
            "reason": "No hallucination detected!",
            "order_number": 0
          }
        ]
      }
    }
  ]
}
Your application decides what happens nextAs with prompt validation, the engine returns results and nothing else. Your code must decide whether to return the response to the user, substitute a fallback, or log a warning and continue.
Seeing guardrail results in traces
Each validation call emits a guardrail span. If your application is already instrumented with OpenTelemetry, the traceparent header is sent automatically and the span nests under the calling span in your trace. Without the header, the engine still groups the prompt and response validations under a trace derived from the inference_id. Either way, the span records whether the call would have been blocked and why. See Traces.
Managing more than one application
A single engine can protect many applications, each with its own rule set. See Managing Multiple Applications with Tasks.
Updated 38 minutes ago