
Managing Multiple Applications with Tasks
Isolate rule sets per use case by routing each application to its own task
Tasks in the GenAI Engine represent conceptual use cases. You can isolate one application, or a set of related applications, by grouping them under their own task. Each task carries its own enabled rules, and every validation call names the task it belongs to.
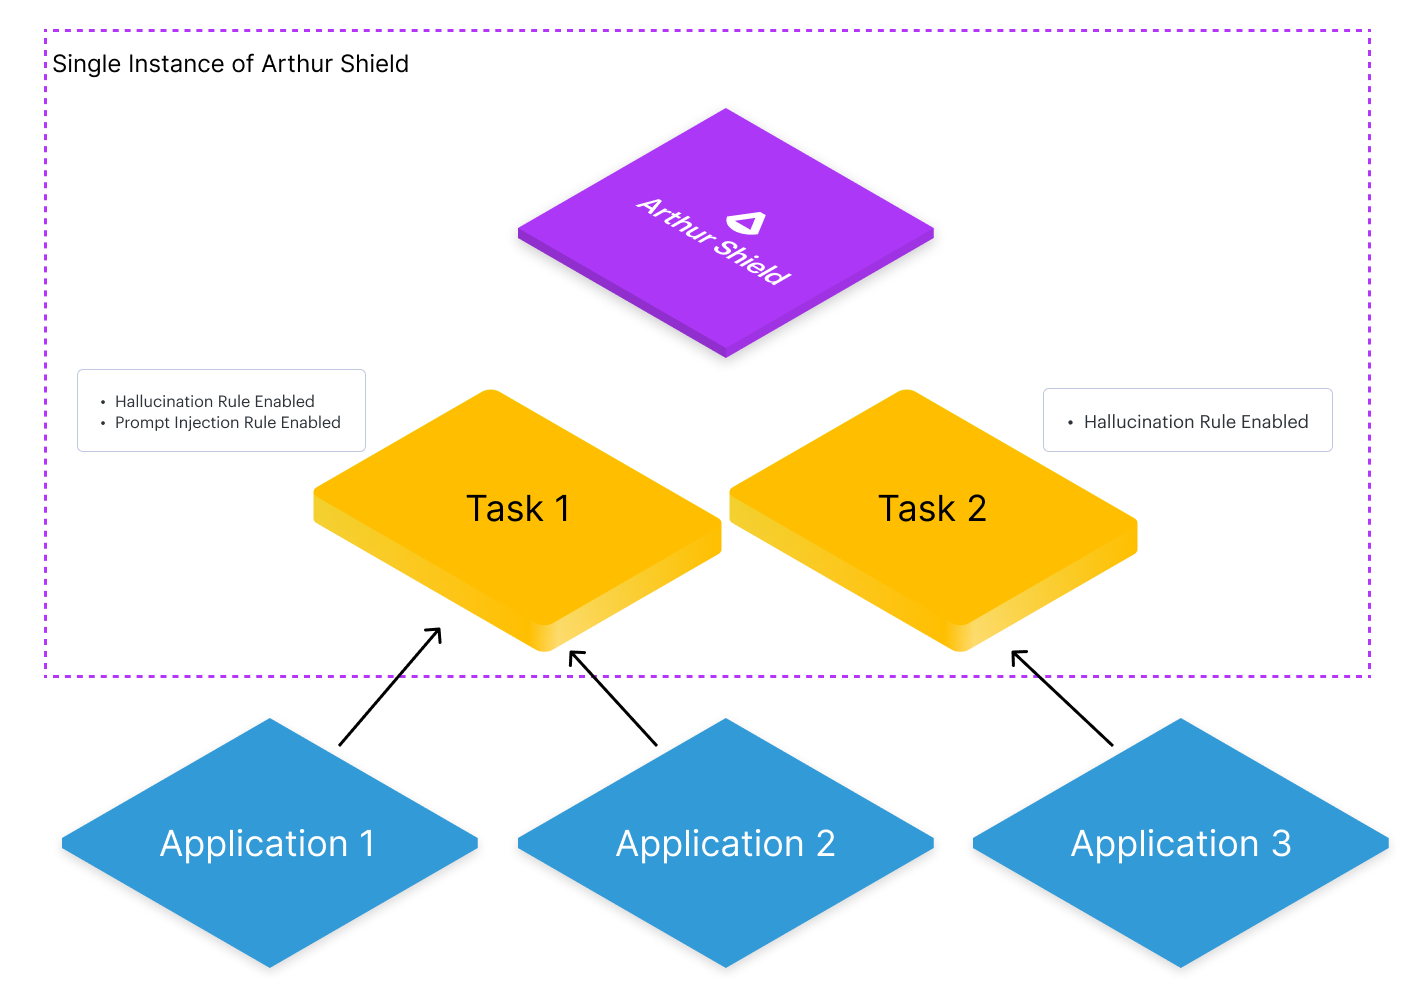
Step 1: Create a task per use case
Create a task for each use case, or group of use cases, that you want to isolate.
POST {hostname}/api/v2/tasks
{
  "name": "Returns Assistant"
}
Hold on to the id returned for each task. Your application needs it for the validation calls in Step 4.
Tasks can also be created in the UI; see Create Task.
Step 2: Configure rules for each task
The engine starts with no rules enabled. Teams decide which rules to turn on and customize them for their organization and each use case.
Step 2a: Default rules for every task
Default rules exist globally within an engine instance. They are applied to every existing task and to every task created afterward. The Rule Configuration Guide explains how to create them.
Step 2b: Task-specific rules
Task rules apply to a single task. When you create a task, all existing default rules are automatically applied to it, and you can see which ones in the rules field of the response.
{
  "id": "f29c9876-4528-425e-934d-eca2c9633a18",
  "name": "Returns Assistant",
  "created_at": 1709316477693,
  "updated_at": 1709316477693,
  "rules": [
    {
      "id": "9719a514-d9eb-4113-9b6c-48499145b293",
      "name": "SSN pattern",
      "type": "RegexRule",
      "apply_to_prompt": true,
      "apply_to_response": true,
      "enabled": true,
      "scope": "default",
      "created_at": 1709316477693,
      "updated_at": 1709316477693,
      "config": {
        "regex_patterns": ["\\d{3}-\\d{2}-\\d{4}"]
      }
    }
  ]
}
Once the task exists, add rules that apply only to it with POST /api/v2/tasks/{task_id}/rules. Enable or disable any rule for the task, including a default rule, with PATCH /api/v2/tasks/{task_id}/rules/{rule_id}. Disabling a default rule for one task does not affect other tasks.
This is the mechanism for per-application policy: a customer support assistant might disable the hallucination rule because it does not use retrieval, while an internal document search assistant keeps it on and adds a sensitive data rule tuned to its domain.
Step 3: Map your applications to tasks
Once tasks and rules are set up, your applications need to know which task_id they belong to. Keep this mapping in your application configuration, alongside the engine hostname and API key.
In multi-tenant deployments, each task belongs to one organization and a tenant API key can only reach the tasks in its organization. Use that scoping when different teams own different applications.
Step 4: Route requests to the right task
As described in the Guardrails Quickstart, each application validates prompts before they go to the LLM by calling validate_prompt. The task is named in the URL path:
POST {hostname}/api/v2/tasks/{task_id}/validate_prompt
Responses are validated the same way after the LLM returns, with the inference_id from the prompt validation:
POST {hostname}/api/v2/tasks/{task_id}/validate_response/{inference_id}
Because the task is part of the path, the engine applies exactly the rules enabled for that task and nothing else. Results are stored against the task, so the inference history and guardrail spans for each application stay separate.
Checking which rules apply to a task
GET /api/v2/tasks/{task_id} returns the task with its full rule list, including each rule's scope (default or task) and whether it is enabled for this task. POST /api/v2/rules/search lets you query rules across tasks by ID, scope, type, or whether they apply to prompts or responses.
Updated 37 minutes ago